SPARCprinter
Option SPRN-400
Xerox 4030
| PART # |
DESCRIPTION |
| 365-1089 |
SPARCprinter (115V & 240V) |
| 365-1124 |
Toner Cartridge 1 |
| 365-1125 |
Drum Cartridge 2 |
| 365-1126 |
Universal Paper Tray |
| 365-1127 |
B4 Paper Tray |
| 370-1365 |
Video Port Cable, Video Port to SPARCprinter |
| 410-1017 |
Reusable Field Service Transit Case |
| 501-1540 |
SBus Printer Board |
| 530-1680 |
Parallel Port Cable |
| 530-1683 |
Loopback Test Cable, Parallel Port to Video Port |
| 530-1694 |
Test Cable, Video Port to Video Port |
| 811-1345 |
Front Cover |
| 811-1316 |
Corotron Assembly |
| 811-1687 |
Fuser Wick 94E95090 (available from SunExpress) |
- The life of the Toner Cartridge is 8000 pages. A J5 error code indicates a
low toner condition. Reset the display when a new Toner Cartridge is
installed.
a. Turn the AC power OFF.
b. Replace the Toner Cartridge.
c. Turn the AC power ON.
d. Press the Reset button located next to the power switch.
- The life of the Drum Cartridge is 20,000 pages. Reset the print counter
when a new Drum Cartridge is installed.
a. Turn the AC power OFF.
b. Install a new Drum Cartridge.
c. Press and hold the Reset button located next to the power switch.
d. Turn the AC power ON.
e. Release the Reset button.
Do not reset the print counter unless a new Drum Cartridge is installed.
Resetting the print counter without replacing the Drum Cartridge causes
mechanical damage to the SPARCprinter when the toner sump fills.
SPARCprinter Operator Panel
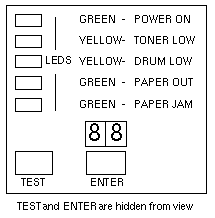
SPARCprinter IOT Test Print
- Switch the printer OFF.
- Press and hold TEST.
- Switch the printer ON.
- Release TEST. 00 is displayed. The printer must warm-up for approximately
one minute in order to print a test page.
- Press ENTER to start printing the IOT test print. The display indicates the
number of test pages printed.
- Press ENTER to stop printing the IOT test print.
- Switch the printer OFF to exit the IOT Test Print Mode.
Reference
- SPARCprinter Service Guide, 800-5044.
SPARCprinter Input Component Tests
- Switch the printer OFF.
- Press and hold ENTER.
- Switch the printer ON.
- Release ENTER. The Operator Panel displays 02.
- Press ENTER to select the Input Component Tests. The Operator Panel
displays 00.
- The following input components can be tested: Fuser Exit Sensor, Toner
Cartridge Switch, Paper Size Sensors, Drum Cartridge Switch, Paper Tray Empty
Sensors, Manual Bypass Feature Switch, Reset Switch, Interlock Switch, and Test
Switch. The input component is functional if the value displayed in the
Operator Panel increases when the component is activated.
- Switch the printer OFF to exit the Sensor Check Diagnostics
SPARCprinter Output Component Tests
- Switch the printer OFF.
- Press and hold ENTER.
- Switch the printer ON.
- Press TEST until the desired diagnostic test number is displayed in the
Operator Panel. The following output components can be tested:
| Component |
Test Code |
| Print Counter |
30 |
| Upper Feed Clutch |
80 |
| Lower Feed Clutch |
81 |
| Registration Clutch |
82 |
| Upper Turn Roll Clutch |
84 |
| Lower Turn Roll Clutch |
84 |
| Main Motor & Erase Lamp |
90 |
| HVPS |
90 |
- Press ENTER to test the component.
- Switch the printer OFF to exit the Sensor Check Diagnostics.
SPARCprinter NVRAM Parameters
- Switch the printer OFF.
- Press and hold TEST and ENTER.
- Switch the printer ON.
- Release TEST.
- Release ENTER when the display shows 03.
- The NVRAM parameter and value are displayed.
- Press ENTER to change a value.
- Press TEST to store a new value.
- Press TEST to display the next parameter.
- Switch the printer OFF to exit the NVRAM Parameters.
| Function |
Address |
Content |
| Processing Direction |
0 |
xx 1
|
| Scanning Direction |
1 |
xx 2 |
| IOT Test Print |
2 |
NA 3 |
| Fuser Temperature |
3 |
xx 4 |
| Laser Power |
4 |
xx 4 |
| Resolution |
5 |
xx 4 |
| Video Mode |
6 |
xx 4 |
| Configuration |
7 |
xx 3 |
| Paper matrix |
8 |
xx 4 |
| Console Type |
9 |
xx 4 |
1 Processing Direction controls the top and bottom page margin.
Each increment from 0 to F adjusts the margin 0.5 mm.
2 Scanning Direction controls the left and right page margin.
Each increment from 0 to 8 adjusts the margin 0.5 mm.
3 Press ENTER to print one test page.
4 Do NOT change these factory settings.
SPARCprinter Error Codes
| RAP |
DESCRIPTION |
C3
C5
C9 |
No paper tray is detected.
The paper tray is empty.
A paper tray print was requested when there is paper
in the manual feed tray. |
E1
E4
E5 |
A paper jam at the infeed roller has occurred.
A paper jam at the outfeed roller has occurred.
The top cover is open. |
J2
J3
J4
J5 |
No drum cartridge is detected.
No toner cartridge is detected.
The drum cartridge has reached end of life.
The toner cartridge is empty. |
| P1 |
The fuser has shut down |
U1
U2
U4 |
The main motor speed dropped below normal during a print cycle.
Laser Failure
Fuser Failure |
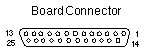
Connector Pinouts
SPARCprinter
20-Pin to 25-Pin Cable 370-1365
25-Pin Female D-Sub |
| PIN |
SIGNAL |
PIN |
SIGNAL |
| 1 |
VCLK+ |
14 |
VCLK- |
| 5 |
LSYNC+ |
18 |
LSYNC- |
| 7 |
STATUS+ |
20 |
STATUS- |
| 11 |
PSYNC+ |
24 |
PSYNC- |
| 23 |
CBUSY+ |
13 |
CBUSY- |
| 9 |
CMD+ |
22 |
CMD- |
| 3 |
VDATA+ |
16 |
VDATA- |
|
 |
|