Board Installation Notes
Backplane Slot Assignment Charts
Each system chart lists the PCB slot assignments in order of
descending priority. In the charts A,B,C... indicates the
preferred location for a specific board. An A is the most
preferred location. An a indicates that a board requires more than
one slot if Memory, Frame Buffer, or other options are installed.
Multiple capital letters (AA, BBB...) indicate a board
requires more than one slot. Boards with multiple part numbers are shown with
a footnote (Sun 3004 CPU 1 ) and are listed in
tables after each grouping of slot assignment charts.
Installing VMEbus Boards
- Refer to the Backplane Slot Assignment Charts to
determine where to install additional boards.
- Move boards in the cardcage as required.
- Configure backplane jumpers for BG3 and IACK. The IACK jumper for the last slot is not present on some backplanes. It is
not needed.
Removing VMEbus Boards
- Refer to the Backplane Slot Assignment Charts to determine
if other boards in the cardcage require repositioning.
- Configure backplane jumpers for BG3 and IACK.
- Install an air restrictor and the external filler panel in any
unused slot.
Sun-3/160
- Sun-3/160 systems using the Pioneer or ETA Power Supply
require FCO 807-0068 to upgrade to a Sun-3/260, Sun-3/460,
Sun-4/260, or Sun-4/360.
- Sun-3/160 systems manufactured prior to July 1987 (serial
number 724E2223) require FCO 808-0067 to upgrade to a
Sun-3/260, Sun-3/460, Sun-4/260, or Sun-4/360.
Sun-3/180, Sun-3/280, and Sun-4/280
Sun-3/180, Sun-3/280, and Sun-4/280 systems manufactured
prior to November 1988 require FCO 807-0073 to upgrade to a
Sun-3/480 or a Sun-4/380.
Sun-3/260 and Sun-4/260
- Do not install an air restrictor in Slot 2.
- Do not install non-memory board options in Slots 2 through 5
using the standard left to right sequence. If possible, leave Slot
2 empty for system cooling.
Sun-3/470
- Remove Jumpers P10, P11, P12, and P13 from the 501-1598
Backplane when the Sun 3400 board set is installed.
- Remove Jumpers P10, P11, P12, and P13 from the 501-1832
Backplane when the Sun 3400 board set is installed.
Sun 3200, 3400, and 4200 ECC Memory
- 501-1092 or 501-1117 Backplanes. Install the first Memory
board in Slot 6. Install 220/270 Terminating Resistor 120-1613-01 at
location F-34 or F-54 on the Memory board.
Remove the Terminating Resistor from location F-34 or F-54 on
Memory boards installed in Slots 2, 3, 4, and 5.
- 501-1439, 501-1598, or 501-1832 Backplanes.
Install the first Memory board in Slot 1. Install 220/270.
Terminating Resistor 120-1613-01 at location F-34 or F-54 on
the Memory board.
If placement results in Memory boards on both sides of the
Sun 3400 CPU, remove the Terminating Resistor at location
O-23 (U1411) on the CPU. Install Terminating Resistors on
Memory boards in Slot 1 and Slot 7.
- Remove Jumpers P10, P11, P12, and P13 from the 501-1598
Backplane when the Sun 3400 board set is installed.
- Remove Jumpers P10, P11, P12, and P13 from the
501-1832 Backplane when the Sun 3400 board set is installed.
GP2
The GP2 does not function with the Sun-2 Color board, Sun-3
Color board, or the Graphics Buffer.
CG5 with GP+ or GP
- The CG5 P2 bus must be disabled (SW3300-5, OFF).
- The CG5 must be installed in slots that do not share the P2
bus with the GP or GP+. Signals provided by the CG5, but not
used by the GP or GP+, may cause contention.
CG5 with GP2
- The CG5 P2 bus must be enabled (SW3300-5, ON).
- The CG5 must be installed in cardcage slots that share the P2
bus with the GP2.
CG5 without GP2
The CG5 P2 bus must be disabled (SW3300-5, OFF).
CG9 with GP2
- The CG9 P2 bus must be enabled (SW3-1, OFF).
- The CG9 must be installed in cardcage slots that share the P2
bus with the GP2.
- This configuration is not supported with the TAAC-1.
- The CG9 is not supported without the GP2.
TAAC-1
- The TAAC-1 requires three slots. Install backplane jumpers
BG3 and IACK in all three slots.
- Sun-3/160 systems require FCO 807-0071, if the TAAC-1 is
installed.
- The TAAC-1 is not supported with the CG9 and GP2 GXP Graphics Options.
Xylogics 450 Disk Controller
- Do not mix the Xylogics 450 with the Xylogics 7053.
- Xylogics 450 is not supported with the 900MB Disk Drive, and
cannot be mixed with the Xylogics 451 in any 900MB Disk Drive
configuration.
Xylogics 7053 Disk Controller
- Do not mix the Xylogics 7053 with the Xylogics 450.
- Systems with Sun-2 SCSI, 501-1138, or Sun-3 SCSI, 501-1217,
may mix a maximum of one Xylogics 451 and two Xylogics 7053s.
- Systems with Sun-2 SCSI, 501-1167, may mix a maximum of
one 451 and two 7053s.
- Systems with Sun-2 SCSI, 501-1149, or Sun-3 SCSI,
501-1170, may mix a maximum of one Xylogics 451 and one
Xylogics 7053.
- The Sun-4/470 and Sun-4/490 may mix a maximum of one
Xylogics 7053 and one ISP-80 IPI-2 controller.
Tapemaster Tape Controller
- The Tapemaster controller is not supported in any Sun-3x or
Sun-4 system.
- Support for the Tapemaster controller was removed from the
Sun 3200 CPU Boot EPROM revision 3.0.
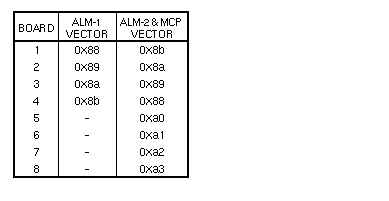
ALM-1, ALM-2, and MCP
- The ALM-2 and MCP share the same base address and interrupt vector.
- The ALM-1 shares the same interrupt vector as the ALM-2 and MCP.
- Because of the conflict with the interrupt vector, no more than
four ALM-1, ALM-2, or MCP boards can be installed at the same time.
- The ALM-1, ALM-2, or MCP boards must be installed in sequential address
order, or a conflict with the interrupt vector may result.
- The maximum combination of ALM-2 and MCP boards
allowed is eight. When mixing ALM-2 and MCP, the MCP must
be addressed as Boards 1, 2, 3, and 4.
- The maximum number of MCP boards is four.
- The maximum number of ALM-2 boards is eight.
ALM-1 501-1157 (Pedestal Systems)
The ALM-1 must be installed in Slots 11 and 12. Install Backplane
Jumpers BG3 and IACK in Slot 11. Remove Backplane Jumper
BG3 from Slot 12.
MAPkit
- The MAPkit requires two slots. Remove Backplane Jumpers
BG3 and IACK from the slot that contains the MAPkit board
nearest to Slot 1. Install Backplane Jumpers BG3 and IACK in
the second slot.
- The MAPkit data throughput rate may be affected if a Tape
Controller or a Disk Controller is installed in an unused slot
between the CPU and the MAPkit.
SunLink Channel Adapter
- The SCA requires two slots. Remove Backplane Jumpers BG3
and IACK from both slots.
- Installing a 1/2" Tape Controller or an SMD Controller in an
unused slot between the CPU and the SCA option may affect
the SCA data throughput rate.
12-Slot Office Pedestal Backplane 501-1382
A cutout in the upper left corner of the 501-1382 Backplane allows
the DC Wire Harness to be routed from the rear of the Backplane
to the front of the Peripheral Tray.
VME to Multibus Adapter Board
Use Adapter board subassembly 501-1054-04, Rev. A, or greater,
to avoid signal contention on the P2 bus. This change was effective
in September 1985 (ECO 1850).
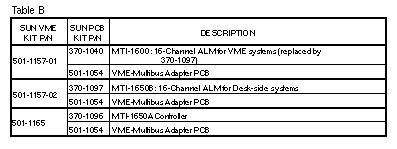
Systech MTI-800, MTI-850, MTI-1600, and MTI-1650
Tables A and B provide reference information for Systech boards
packaged in kits.
Table A identifies the ALM boards in a Sun PCB kit. Columns 2,
3, and 4 provide the Sun PCB part number, a board
description, and the Systech part number for individual boards
within each set.

Table B describes the boards in a Sun VME assembly kit. This
assembly contains an ALM board set, a VME-Multibus Adapter
PCB, and frame. Column 1 lists the Sun VME assembly part
number. Columns 2 and 3 provide the part numbers and a
description of the ALM channel and the VME-Multibus Adapter
PCB in the Sun VME assembly kit. Only three of the PCB kits from
Chart A are used as VME options. Systech discontinued the 800/1600
series when the 850-1650 series was introduced. Replace
the entire VME assembly upon failure of any component in these
VME options.
|