| InfoDoc ID | Synopsis | Date | ||
| 30 | Troubleshooting Aid: Libraries/Autoloaders/DLT Drives, Robotics, & Controllers | 13 Jun 2002 |
| Status | Issued |
| Description |
The Libraries, Autoloaders and DLT drives in this `Troubleshooting Aid' documentation are all for SCSI-2 interface and the Quantum DLT drives. This is a general `Troubleshooting Aid' and problems may vary from system to system. This `Troubleshooting Aid' was developed by `Network (Removable) Storage Engineering' in order to aid the field support team to better support and service our Sun clients. This is not intended to be a complete `Troubleshooting Aid' for all aspects of field issues, but rather this can be a good starting or reference point to review the latest information available in troubleshooting aids before visiting a customer for a service call. This `Troubleshooting Aid' will be up dated as better techniques in troubleshooting become available and when new firmware (f/w) or new patches are released. The goal we wish to accomplish with this document is as follows: The customer is up and running in the shortest possible time and no frustration has set in to any party...
Here are some of the basic things to look at first in the Troubleshooting of Libraries and Autoloaders with SCSI DLT drives. Ensure you have good SCSI cable connections and visually check the pins and the thumb screws. For perpetual or unexplained errors, repeated power supply or drive failures, confirm the A.C. line is clean, meets specification and is noise free. If necessary, connect an AC line analyzer for the duration of backing up data and confirm there is a good AC supply by monitoring this line for two to three days. Check AC connectors and for good grounding. Here are some inexpensive AC line monitors can be purchased and used at a depot level. Remember, these AC line monitors will help recognize the first sign that problems may exist with the AC line. For a more detailed analysis, obtain an AC line monitor that has a print out and full capabilities. It may also be necessary to call the AC power supply manufacturer. It is also a good idea, when in doubt, to monitor the site for a clean AC line for three days or so when a new installation is planned.
This document cannot go into AC line specification in detail. For such details, please inquire with the AC power supply manufacturer. Since this document will be available world wide, listed below are some inexpensive monitors for countries that may have difficulty in obtaining such monitors. Please note, these are only suggestions.
	Tasco Inc.
      	2895 West Oxford Avenue, #7
	Englewood, Colorado, 80110, U.S.A.
	Tel: 1-800-999-9952 (In the USA)
	303-762-9952 (Outside of the USA)
303-762-1205 FAX SCSI terminators are very important. There are generally two types for SCSI use.
Part number 150-2267-01 for wide (16 bits) SCSI are used for SCSI devices that support single-ended interfaces. On Sun external terminators, look on the case of the terminator, there should be a symbol which indicates it is an SE terminator.
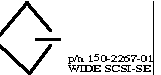
Devices can be placed up to 6 meters from the host and only the last device needs to be terminated, if the last device is not an auto-terminating device.
Depending on the speed of the transfer rate, use the following pointers:
| Signal Frequency | Narrow Data Width Speed | Wide Data Width Speed | Max. Single-ended Bus Length | Max. HV Differential Bus Length |
|---|---|---|---|---|
| SCSI-1 synch | 5 MB/sec | 10 MB/sec | 6 meters | n/a |
| SCSI-2 (FAST) | 10 MB/sec | 20 MB/sec | 6 meters | 25 meters |
| Ultra (Fast20) | 20 MB/sec | 40 MB/sec | 1.5 or 3 meters* | 25 meters |
* - 1.5 meter limit for 4 or less devices, 3 meters for more than 4 devices.
Note:Only SE terminators can be used for single-end SCSI bus/devices.
Part number 150-1890-02 HVD terminators are used for SCSI devices that support the differential SCSI interface. All of Sun's libraries are HVD. For Sun external terminators, look on the case of the terminator, there should be a symbol which indicates that it is a differential terminator.
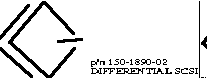
Devices can be placed up to 25 meters from the host and only the last device needs to be terminated if the last device is not an auto-terminating device. For other makes of terminators see designation on the terminator case itself. It is rare, but terminators can also go bad. In some intermittent and unexplained problems, do go ahead and replace the terminator and test. Also make sure the term power at the terminator meets specification of 5v +/- 5% in most cases and noise does not exceed, best case, 50v p/p.
Note 1: If an SE terminator is used on a differential bus, the bus will fail and no drives will be visible to the host. The same happens if a differential terminator is used on a single-ended SCSI bus.
Note 2: When external terminators have a green LED between the two thumb screws, when ON, indicates that the terminator is alive and is receiving +5v from the host adapter. Good first sign.
Sun is currently using a few drive models, either in desktop, autoloaders or library configurations. These are the DLT4000 & DLT7000, DLT8000, DLT-1, SDLT and LTO.
For the L1000, L1800, L3500 and L11000, the DLT7000 drive firmware is the same, but the L280 has different drive firmware revision. Remember the drives communicate with the library controllers via a serial port internally and hence different manufacturers implement their commands/timing slightly differently. So the drives talks to the library controller via serial port internally while it talks directly to the systems host adapter via SCSI protocol. Also don't forget the library talks to the system host adapter via SCSI protocol. Also Sun desktop DLT drives have different drive firmware than library drive firmware, as you can see below.
Note: Sun desktop DLT4000 and the DLT4700 autoloader drive, use the same firmware for the drives, xxsunxx. In general, when the firmware revision is indicated as `xxsun.xx', this is for Sun desktop DLT drives only and can not be used for library drives. If, on the other hand, the firmware revision is indicated as xxoml.xx (original manufacturing library), then the firmware can be downloaded to the DLT drive, and the drive would be one in an autoloader or Library, not a stand-alone drive.
| DLT 4000 | ||||||
|---|---|---|---|---|---|---|
| Firmware Revision | Firmware Description | Date | Status | Platform | Patch ID Number | Remarks and OS |
| d4sun1.v80 | Some field units may have this firmware | 12/02/97 | discnt | Sun Only | N/A | Solaris 2.5, 2.6, 7 |
| d5sun126.img | none | 12/04/98 | discnt | Sun Only | N/A | Not Released |
| D4sun-1.130 | DLT4000 V130 SUN Code | 10/15/99 | active | Sun desktop and DLT4700 autoloader | 107592-01 Released | Solaris 2.5, 2.6, 7 - Solves probe-scsi-all issue and disconnected timeout |
| DLT 7000 | ||||||
|---|---|---|---|---|---|---|
| Firmware Revision | Firmware Description | Date | Status | Platform | Patch ID Number | Remarks and OS |
| d7oml1.v72 | DLT7000 V72 OML Code | 4/15/98 | discnt | Sun, Windows NT | N/A | L1000, L1800, L3500, L11000, generic - Solaris 2.5, 2.6, 7 |
| D7sun1.v72 | DLT7000 V72 Sun Code | 5/20/98 | discnt | Sun Only | N/A | Sun desktop only |
| D7oml1.v80 | DLT7000 V80 OML1 | 10/15/99 | active | Sun, Windows NT | N/A | L280 DLT drives only, generic - Solaris 2.5, 2.6, 7, Windows NT 4 |
| D7oml1.v96 | DLT7000 V96 OML1 | xx/xx/xx | Inprocess | Sun, Windows NT | xxxxxx-xx | L280 DLT drives only, generic - Solaris 2.5, 2.6, 7, Windows NT 4 |
| D7-v85.OML | DLT7000 V85 OML | 10/15/99 | discnt | Sun, Windows NT |
107590-01 obsoleted, 108094-01 obsoleted |
L1000, L1800, L3500, L11000, generic - Solaris 2.5, 2.6, 7 - Solves frequent clean tape messages |
| D7sun-1.v85 | DLT7000 V85 Sun code | 10/15/99 | discnt | Sun Only | 108418-01 obsoleted | Sun desktop only |
| d7v95.sun | DLT7000 V95 Sun Code | 12/21/99 | active | Sun Only | 108408-01 | Sun desktop only |
| D7OML1.V95 | DLT7000 V95 OML | 11/01/99 | active | Sun, Windows NT | 108437-03 | 1000, L1800, L3500, L11000, generic - Solaris 2.5, 2.6, 7 - See patch for change description and dependencies |
| V101 | DLT7000 V65 | L180, L700 | ||||
| DLT 8000 | ||||||
|---|---|---|---|---|---|---|
| Firmware Revision | Firmware Description | Date | Status | Platform | Patch ID Number | Remarks and OS |
| v80 (50h) | none | -- | active | Flexipack | -- | Released |
| v59 (3Bh) | none | -- | active | L9,L20 | See below | Released |
| v80 (50h) | none- | -- | active | L180,L700 | -- | Released |
To configure the st.conf file for the DLT8000 drive or the L-9 with DLT8000, use the following patches for Solaris S7 and S8.
Solaris 8: patch# 108725-03
Solaris 7: patch# 107460-10
Note: No st.conf modification is required for the DLT8000 drive once the above patch has been installed.
Supported on Solaris 2.5.1 and 2.6: Modify the st.conf file to include:
QUANTUM DLT8000 , Quantum DLT8000 , DLT8k-data ,
DLT8k-data = 1,0x36,0,0x9639,4,0x84,0x85,0x88,0x89,3;
For st.conf modification process, see section 9.0 below.
        TAPE DEVICES:
	rmt/0: QUANTUM DLT7000, Rev. 2255
	rmt/1: QUANTUM DLT7000, Rev. 1E48
	Total Devices: 2
2255 and 1E48 indicate the drive's firmware and are translated as follows:
The following commands are helpful in determining the firmware revision of a drive:
Sometimes it is possible to find resolution to issues by reviewing the firmware change description and history. Network Storage Engineering will do its level best to provide a complete summary of change description for each firmware change. A short change history will be given under `Remarks & O/S', more detail will be given in the specific patch release with the resolved bug id number.
Note: All of Sun's robotics firmware are generic and support all Solaris OS revisions and Windows NT.
| L11000 Library Robotics Firmware | ||||||
|---|---|---|---|---|---|---|
| Firmware Revision | Firmware Description | Date | Status | Platform | Patch ID Number | Remarks and OS |
| 1.12 | Application | N/A | active | generic | N/A | none |
| 1.20 | Application | N/A | discnt | generic | N/A | Yield issue in production line |
| d_1_21r | Application | 6/04/99 | discnt | generic | N/A | none |
| d_1_21p3 | Application | xx/xx/xx | discnt | generic | 108406-01 | Solves load port issue; has dependencies, fast carriage movement |
| 1.15r | Application | 8/7/00 | active | generic | 108406-02 | For L11000 with s/n 934BA00434 and below ONLY. |
| 1.45r | Application | 8/18/00 | active | generic | 110025-01 | For L11000 with s/n 934BA00435 and above ONLY |
| 1.21 | Boot Block | xx/xx/xx | active | generic | N/A | none |
        Revision: Application 1.12
	Revision: Boot Block 1.11
| L3500 Library Robotics Firmware | ||||||
|---|---|---|---|---|---|---|
| Firmware Revision | Firmware Description | Date | Status | Platform | Patch ID Number | Remarks and OS |
| 2.11 | Robotics Controller | N/A | discnt | generic | N/A | Has tape cleaning issue with V72 or V85 |
| 2.21 | Robotics Controller | N/A | discnt | generic | N/A | Has tape cleaning issue with V72 or V85 |
| n_2_31r | Robotics Controller | N/A | discnt | generic | N/A | Not qualified |
| n2_32p0 | Robotics Controller | 10/15/99 | discnt | generic | N/A | Solves frequent tape cleaning issue with V85 |
| n_2_40p1 | Robotics Controller | N/A | discnt | generic | N/A | Solves load port issue |
| n_2_40R | Robotics Controller | 12/9/99 | active | generic | 108602-02, has dependency to 108437-03 | Solves n_2_40R introduced problem with autoload which is encountered if library is full. Solves problem in Initialize Element Status with range, which is found when the range specified is more than the number of elements in the library |
| L1800 Library Robotics Firmware | ||||||
|---|---|---|---|---|---|---|
| Firmware Revision | Firmware Description | Date | Status | Platform | Patch ID Number | Remarks and OS |
| 2.11 | Robotics Controller | N/A | discnt | generic | N/A | Has tape cleaning issue with V72 or V85 |
| 2.21 | Robotics Controller | N/A | discnt | generic | N/A | Not qualified |
| s2_31p0 | Robotics Controller | 10/15/99 | discnt | generic | N/A | Solves frequent tape cleaning issue with V85 |
| s2_32p1 | Robotics Controller | 10/15/99 | discnt | generic | N/A | Solves frequent tape cleaning issue with V85 and load port issue. Solves unexpected library fault |
| s_2_34v | Robotics Controller | 1/8/00 | active | generic | 108598-03, has dependency to 108437-03 | See patch for change description |
| L1000 Library Robotics Firmware | ||||||
|---|---|---|---|---|---|---|
| Firmware Revision | Firmware Description | Date | Status | Platform | Patch ID Number | Remarks and OS |
| 1.20 | Robotics Controller | N/A | discnt | generic | N/A | none |
| 2.01 | Robotics Controller | 7/12/00 | active | generic | 109780-01 | none |
        Revision: Application 1.12
	Revision: Boot Block 1.11
| L280 Autoloader Robotics Firmware | ||||||
|---|---|---|---|---|---|---|
| Firmware Revision | Firmware Description | Date | Status | Platform | Patch ID Number | Remarks and OS |
| 2.07 | Autoloader Controller | N/A | discnt | generic | N/A | none |
| 2.08 | Autoloader Controller | N/A | discnt | generic | 107593-01 | Solves load issues |
| 2.09 | Autoloader Controller | 11/1/99 | active | generic | 108407-01 | Solves FUP load issues |
| 2.10 | Autoloader Controller | xx/xx/xx | Inprocess | generic | xxxxxx-01 | none |
| 17-Mech | Autoloader Controller | N/A | discnt | generic | N/A | none |
| 20-Mech | Autoloader Controller | 10/15/99 | active | generic | N/A | PROM replacement on pcb required |
| 23-Mech | Autoloader Controller | 1/22/99 | active | generic | N/A | Change for factory only |
Go to the GUI of the L280 and press `Next' until you see `ADMIN'. Then press `Enter' --> `Password' --> `INFO', using the `Next' button look for information similar to this example:
        Loader FW --> Enter --> v80
	Drive FW --> Enter --> 2.09
	Mech FW --> Enter --> 20
The L280 is sometimes called an autoloader because it can function as a sequential tape loader and it does not have bar code reader. But the L280 can also run as random loader by configuring it via the GUI menu tree. See the L280 user's manual Sun p/n 805-3957-10-1 for more information. The L280 does inventory of tape slots to determine which slots have tapes loaded or not.
Note: The L280 has three firmware levels for your consideration as follows.
Hint: If the `Circular' mode on an L280 is set to `ON', and the L280 is being used as a stacker or a sequential device, the L280 will overwrite the first tape once all of the tapes have been written to. To prevent this from happening, turn the `Circular' mode of the L280 to `OFF'. Then the L280 will stop after the last tape is written to.
| L9 Autoloader Robotics Firmware | ||||||
|---|---|---|---|---|---|---|
| Firmware Revision | Firmware Description | Date | Status | Platform | Patch ID Number | Remarks and OS |
| v2.26s | -- | -- | Released | N/A | N/A | With DLT8000 drive. |
This personality bit list is also known as Vendor Unique page 3Eh in SCSI. In order to enhance the performance of the DLT drives with our Sun platforms and host adapters, Sun Storage Engineering has altered some of the bits from the original Quantum setting. Please see the EEPROM list for a specific drive and compare with the list given in a patch as the case may be. The `dltprops' utility will need to be used in order to view the list or alter the bits. The EEPROM bit list may change when a new firmware version is downloaded. If this happens, this will be explained in the patch and the new EEPROM values will be indicated to be updated.
Note:Take extra precautions not to make any errors in this list when changing any bit, as the functionality or performance of the drive may suffer.
"Density code selection" is a technique that allows higher or lower, bit density or `bits per inch' (bpi) recording on a tape.
There are two ways to select density:
"Data Compression" is the process in which an algorithm is used to minimize flux changes by removing redundant bit sequences in order to pack a high volume of bits onto a given length of tape, thereby compressing the data on a tape. When such a tape is read back, the drive must decompress the data using its decompressing algorithm, before putting it on the SCSI bus back to the host.
Also note, there are two ways to command hardware compression:
Confusion may occur as to when hardware or software compression is taking place. If the DLT drive is doing the compression using the button on the drive or by mode select from the system, this is still hardware compression. If the system is using a compression utility to compress the data before it is sent to the drive for writing, this is called software compression. Sun generally uses hardware compression, which means the drive will do the compression.
The method to select the desired density code is by using the `SCSI MODE SELECT' command or using the button on the drive and writing data to the tape from `BOT'. Please note, when the button is used to select density, it will override any selection made from the system. In other words, the button has priority over the density code command coming from the system. It is very important to understand how the density code function is designed with the DLT7000 drives. There have been many inquiries and in some cases, mis-understanding as to how the density code is implemented with the DLT7000 drives.
The DLT7000 drive has a button on the front left side of the bezel to select density codes for all of the ATL (Automated Tape Library) libraries. The exception being the L280, it has no buttons at all on the DLT drive and hence, all density command selections must come from the system. However, compression can be selected ON/OFF using the L280 GUI. Because the ATL library cannot be opened and the setting changed every time using this button, the only option is to use the `mode select' SCSI command.
Now that the differences between density codes and compression have been explained, here are the options that are available and how they are specified using UNIX density specifiers.
Caution: If a prerecorded tape is reused and write is executed from the beginning of tape (BOT) (No Append Write), all prerecorded data is lost. This includes density changes, since they only occur when writing from BOT.
| Selecting Density and Capacity Gains | ||
|---|---|---|
| Cartridge Type Used | Capacity | Selection Method |
| CompactTape IV* | 20 GB | By density selection, compression off |
| CompactTape IV* | 35 GB | Compression off, native default |
| CompactTape IV* | 70 GB | Compression on |
| CompactTape III | 2.6 GB | By density selection, compression off |
| CompactTape III | 6 GB | By density selection, compression off |
| CompactTape III | 10 GB | Compression off, native default |
| CompactTape III | 20 GB | Compression on |
| CompactTape IIIxt | 15 GB | Compression off, native default |
| CompactTape IIIxt | 30 GB | Compression on |
Note: For a given cartridge type, only the indicated capacities are possible (DLT7000).
* - For DLT CompactTape IV, on all read and write operations, the recorded density is the density to be used. For a write from BOT, the density may be changed by one of the following:
| Density Code Selection Parameters (from UNIX and drive level, DLT7000) | ||||||
|---|---|---|---|---|---|---|
| Density Specifiers, System Level, Solaris | Hex Code, Drive Level | Bits Per Inch (bpi) | Cartridge Type - Compact Tape | Remarks | ||
| � | 00h | xx | � | use default density | ||
| � | 17h | 42500, 24 track pairs | � | 2.6 GB | ||
| � | 18h | 42500, 56 track pairs | � | 6.0 GB | ||
| � | 19h | 62500, 64 track pairs | � | � | ||
| l | 1Ah | 81633, 64 track pairs | IV | 20 GB, no compression | ||
| � | 1Bh | 85937, 52 tracks | � | 35 GB | ||
| � | 7Fh | 85937, 52 tracks | � | NO-OPERATION, NOPR | ||
| l/h | 80h | 62500, 64 track pairs | III/IIIxt | 10/15 GB no compression | ||
| m/u | 81h | 62500, 64 track pairs | III/IIIxt | 20/30 GB w/compression | ||
| � | 82h | 81633, 64 track pairs | � | 20 GB w/compression | ||
| � | 83h | 81633, 64 track pairs | � | 40 GB w/compression | ||
| h | 84h | 5937, 52 quad tracks | IV | 35 GB no compression | ||
| u | 85h | 85937, 52 quad tracks | IV | 70 GB w/compression | ||
| l | 82h | 81633, 64 track pairs | IV | 20 GB no compression-DLT8000* | ||
| m | 84h | 85937, 52 quad tracks | IV | 35 GB no compression-DLT8000* | ||
| h | 88h | 98250, 52 quad tracks | IV | 40 GB no compression-DLT8000* | ||
| u | 89h | 98250, 52 quad tracks | IV | 80 GB w/compression-DLT8000* | ||
* - The DLT8000 is not released at this time, it is included in this chart for reference only.
Legend for density specifiers, system level:
        l = low
	m = medium
	h = high
	u = ultra high or compressed
Note: The st.conf file provides a correspondence between l, m, h, u and the hex code above. The st driver uses the hex code to instruct the drive which density code to use on writes.
To send a UNIX command to set density, use the following:
#mt -f /dev/rmt/4u rewind
The above command tells the drive unit 4 to set density in compressed mode `u' and rewind.
To get to BOT condition when switching density, for example:
/dev/rmt/0lbn
The above, specifies unit 0, low density, BSD behavior, and no rewind.
For more information see man pages for `mt' and `st'
| Cartridge Tape Specifications | |||
|---|---|---|---|
| Cartridge Type | Length | Usage/Life | Operating Temperature |
| CompactTape III | 1200ft | 500k passes, 30 years min. shelf | 20C ideal 40% RH nc |
| CompactTape IIIxt | 1800ft | 500k passes, 30 years min. shelf | 20C ideal 40% RH nc |
| CompactTape IV | 1800ft | 500k passes, 30 years min. shelf | 20C ideal 40% RH nc |
Legend:
        RH = Relative Humidity
	nc = non-condensing
| Media and Drive Compatibility | |||
|---|---|---|---|
| Drive | CompacTape III | CompacTape IIIxt | CompacTape IV |
| 4000 | 2.6 GB, 6 GB, or 10 GB | 15 GB | 20 GB |
| 7000 | 2.6 GB, 6 GB, or 10 GB | 15 GB | 20 GB or 35 GB |
| 8000 | 10 GB | 15 GB | 20 GB, 35 GB or 40 GB |
* - Listed capacities are native (No compression)
|
Tape Device |
l Off |
m On |
h Off |
u On |
Density modifier Compression on/off |
| DLT4000 |
0x80 10GB |
0x81 20GB |
0x82 20GB |
0x83 40GB |
<- Density code <- Capacity |
| DLT7000 |
0x82 20GB |
0x83 40GB |
0x84 35GB |
0x85 70GB |
<- Density code <- Capacity |
| DLT8000 |
0x84 35GB |
0x85 70GB |
0x88 40GB |
0x89 80GB |
<- Density code <- Capacity |
|
SDLT 220 |
0x88 40GB |
0x89 80GB |
0x90 100GB |
0x91 200GB |
<- Density code <- Capacity |
u = ultra/compressed, density codes are in hex.
e.g. /dev/rmt/[0- 127][l,m,h,u,c][b][n]
/dev/rmt/1ucn = allow compression 'u' on device /dev/rmt/1
Note DLT8000: Default density of a DLTtape IV cartridge is 40.0 GB,
native (compression OFF), or 80 GB, compressed. A density of 35.0 GB
native (compression OFF), or 70 GB, compressed OR 20.0 GB native
(compression OFF), or 40 GB, compressed, is user-selectable.
Many questions had been raised in the past regarding performance. Performance greatly depends on the following.
Asynchronous = For each ack/req, one byte of data is transferred (slow SCSI data transfer process).
Synchronous = For every req, multiple bytes are transferred and then complemented by the same number of acks (fast SCSI transfer process).
        Request (req) is generated only by the target.
	Acknowledge (ack) is generated by the host only.
The DLT7000 drive can transfer 5mb/s ideally and with compressed data up to 10mb/s. At 5mb/s native, ideally up to 18,000mb/hr (18gb/h) and with compression at 10mb/s this can get up to 36,000mb/h or (36gb/h). But remember these numbers are only attainable under ideal conditions.
Hint: SCSI is target driven. The target decides when to change phase.
# mt -f /dev/rmt/xx stat
A good "match" from st.conf looks something like this example:
              Quantum DLT7000 tape drive:
	      sense key(0x6)= Unit Attention residual= 0 retries= 0
	      file no= 0 block no= 0
A bad match may look something like this example:
              Vendor `QUANTUM' Product `DLT7000 ' tape drive:
	      sense key(0x0)= No Additional Sense residual= 0 retries= 0
	      file no= 0 block no= 0
or
              SCSI tape drive:
	      sense key(0x0)= No Additional Sense residual= 0 retries= 0
	      file no= 0 block no= 0
If the DLT7000 drive is a desktop unit the `QUANTUM' will be displayed as `SUN', when the mt command is issued as noted above.
        008 = Global Disconnect/Reconnect
	010 = Global Linked Commands
	020 = Global Synchronous XFER Capability
	040 = Global Parity Support
	080 = Global Tagged Command Support
	100 = Global FAST SCSI Support
	200 = Global WIDE SCSI Support
	400 = Global ULTRA SCSI Support
	===
	7f8 = All SCSI Options Enabled
Example of /etc/system file with 7f8 set for scsi_options:
        * `modsys' modified /etc/system on `0921.1507'
	set scsi_options=0x7f8
	set maxusers=4096
	set bufhwm=10425
	set obpdebug=1
	set forthdebug=1
	set hsfs:nhsnode=1200
	set sd:sd_error_level=0
	set st:st_error_level=0
In nearly all cases, it may not be necessary to set the options parameter, but it may be advisable to check the `scsi_options' parameter settings, especially when customers complain of slow transfer rates or such similar issues. Please note, generally this action is not needed and it is recommended that only someone who is well informed about SCSI and UNIX (like an SSE) should attempt this effort. The scsi_options parameter is a global parameter that affects all host adapters (fas/isp/glm) that may be in the system. By default, scsi_options is set to 0x7f8 by the kernel to enable host adapter drivers to negotiate any targets to their highest SCSI speed, thus setting "set scsi_options=0x7f8" has no effect.
However, if for some reason it is found that the options parameter is set below the `7f8' value or is too restrictive, then it is possible for the system performance as a whole to have a negative effect.
The glm driver uses the following algorithm to decide how to negotiate SCSI speeds with any targets:
If one desires to restrict the glm driver from negotiating with specific targets for the higher SCSI speeds, it's better to use the per target setting through a glm.conf file.
Notes:
The st.conf file is many times overlooked as far as configuration for tape drives. When the st.conf file is not set up correctly, the transfer rate suffers because the drive will default to the generous st.conf parameters (known as Quick 11) and this is noticeable quickly when attempting to perform a backup operation.
        {1}tape-config-list =
	{2}"DLT tape unit","{3}"DLT tape reference name","{4}"DLT tape data";
| DLT Tape Product | DLT Tape Unit |
|---|---|
| DLT4000 | Quantum DLT4000 |
| DLT4500 | Quantum DLT4500 |
| DLT4700 | Quantum DLT4700 |
| DLT7000 | QUANTUM DLT7000 |
| DLT8000 | QUANTUM DLT8000 |
Note:The total string character count, including spaces, must equal 15. For example:
QUANTUM DLT7000 = 123456789ABCDEF
The st.conf file is used by Sun's st (scsiscsi tape) device driver. Edit the st.conf file entries by removing the `#' (to add) or inserting a `#', in order to ignore a drive from the listing as needed.
If, for example, a DLT7000 drive is being added to a system, the output from the `inquiry' command produced something like this:
  TAPE DEVICES:
            rmt/0:   QUANTUM          DLT7000,          Rev. 2255
            rmt/1:   QUANTUM          DLT7000,          Rev. 1E48
        Total Devices:  2
Look for the line within the tape-config-list portion of the st.conf file that corresponds to the `QUANTUM DLT7000' and remove the `#' sign at the beginning of the line. Then put a semicolon (;) at the end of the line. Be sure that all other lines end with a comma (,). This is very important, only one line in the tape-config-list portion of the file can end with a semicolon (;).
Then, look for the line with "DLT7k-data" in the second portion of the st.conf file and remove the `#' from the beginning of the line. The st.conf file lines that were just edited should look like this example:
#"Metrum",           "Metrum VHS Cartridge", "MetD",
 "QUANTUM DLT7000",  "Quantum DLT7000",      "DLT7k-data";  <-----(Note no `#' here
#"SUN     DLT7000",  "Sun DLT7000",          "DLT7k-data",         also see `;' end))
.
.
.
  DLT7k-data =  1,0x38,0,0x1D639,4,0x82,0x83,0x84,0x85,3;  <-----(Note no `#' here)
.
.
"DLT tape data" = 1, 0x38, 0, 0x8639, 4, 0x17, 0x18, 0x82, 0x83, 3;
"DLT tape data" = 1, 0x38, 0, 0x8639, 4, 0x82, 0x83, 0x84, 0x85, 3;
"DLT tape data" = 1, 0x38, 0, 0x8639, 4, 0x84, 0x85, 0x88, 0x89, 3;
Notes:
Here is a sample of an st.conf file with some irrelevant items removed, showing the correct configuration for a DLT7000.
 st.conf file
 # Copyright (c) 1995, by Sun Microsystems, Inc.
 # All rights reserved.
 ##pragma ident	"@(#)st.conf	1.21	98/03/25 SMI"
 # This file contains configuration entries for both officially supported
 # devices of Sun Microsystems and many 3rd party devices.
 # # The officially supported devices are :
 #   "ARCHIVE Python 28454"
 #   "Quantum DLT7000"
 #   "Quantum DLT4000"
 #   "SUN     DLT7000"
 #   "SUN     DLT4000"
 #   "SUN     DLT4700"
 #   "TANDBERG TDC 4200"
 #   "TANDBERG SLR5"
 #
 # The 3rd party devices do apparently work with the configurations listed.
 # All the entries have been taken from the net and probably have worked in
 # the past, but have not been tested by Sun Microsystems.  Use these entries
 # as your starting point for generating your configuration entries.
 #
 #
 tape-config-list=        -----------------------------------------(Note no `#' here)
 #   "Emulex  MTO2",		"Emulex MT02 QIC-11/QIC-24",	"MT02",
 #   "ANRITSU DMT2120",	"Unisys 1/2\" Reel",		"ANRITSU",
 #   "Metrum",		"Metrum VHS Cartridge",		"MetD",
     "QUANTUM DLT7000",      "Quantum DLT7000", "DLT7k-data";  -----(Note no `#' here
 #   "SUN     DLT7000",      "Sun DLT7000",     "DLT7k-data",         also see `;' end))
 #   "Quantum DLT4000",      "Quantum DLT4000", "DLT-data",
 #   "SUN     DLT4000",      "DLT4000",         "DLT-data",
 #   "SUN     DLT4700",      "DLT4700 Library", "DLT-data",
 #   "R-BYTE  RB100",	"R-Byte Whozits",		"DAT",
 #   "SONY    SDT-5000",	"SONY 4mm DAT",			"DAT",
 #DLT2	 =	1,0x38,0,0xd639,4,0x17,0x18,0x80,0x81,2;
 #DLT-data =   	1,0x38,0,0xD639,4,0x80,0x81,0x82,0x83,2;
  DLT7k-data = 	1,0x38,0,0x1D639,4,0x82,0x83,0x84,0x85,3; ----(Note no `#' here)
 #EXB-2501	=	1,0x28,1024,0x442,1,0x00,0;
 #EXB-8200	=	1,0x28,0,0x8c79,1,0x00,0;
 #WtQIC		=	1,0x32,512,0x467a,1,0x00,0;
 name="st"scsiss="scsi"
     target=0 lun=0;
Note: The same `DLT7k-data' name should be used for {3}"DLT tape reference name" and {4}"DLT tape data".
The "DLT tape data" field in the st.conf file contains 10 parameters and are described as follows:
              [1]  [2]  [3]  [4]    [5] [6]   [7]   [8]   [9]  [10]
DLT7k-data =   1, 0x38,  0, 0x8639,  4, 0x82, 0x83, 0x84, 0x85,  3;
Note: Use 0x36 in place of the 0x38 value for Solaris 2.5.1 configurations and below. In Solaris 2.6, it may be necessary to apply the Solaris 2.6 recommended patch cluster in order to use the 0x38 value, but the 0x36 value should also work.
| Option | Value |
|---|---|
| ST_VARIABLE | 0x0001 |
| ST_BSF | 0x0008 |
| ST_BSR | 0x0010 |
| ST_LONG_ERASE | 0x0020 |
| ST_KNOWS_EOD | 0x0200 |
| ST_UNLOADABLE | 0x0400 |
| ST_NO_RECSIZE_LIMIT | 0x8000 |
The `st' man page has more information about these and other possible device options. For certain applications, it may be necessary to consider adding or removing one or more of the device options. But generally, the default works well.
Note: For more information, check the st.conf man page.
For Windows NT application, only the generic type of firmware can be used with the DLT drives. The Sun-specific firmware used in the desktop flexipack, cannot be used and the drive fails to be recognized by NT configurator.
Note: At this time drives that have the Sun version of the firmware, will not accept the generic firmware if attempt is made to download the generic firmware. This is due to a lock bit set in the drive not to allow a generic firmware to be download. This will change in the future to make all our DLT drive able to receive generic firmware and be able to be recognized by win-NT. Also our DLT firmware, in the EEPROM page, certain bits are set as such in order to make the drives more tolerable to various speed scsi host adapters.
| Independent Software Vendor (ISV)/Backup Utility | Platform Supported | Remarks |
|---|---|---|
| Veritas NBU 3.1.1 | L1000, L1800, L3500, L11000, L280, L9 | Solaris 2.5, 2.6, 7 |
| Veritas NBU 3.2 | L1000, L1800, L3500, L11000, L280, L9 | Solaris 2.5, 2.6, 7 |
| Legato/Solstice BackUp 5.1.1 | L1000, L1800, L3500, L11000, L280, L9 | Solaris 2.5, 2.6, 7 |
| run-cpio | L280, L8, flexipack | Solaris 2.5, 2.6, 7 |
| tar | L280, L8, flexipack | Solaris 2.5, 2.6, 7 |
| ufsdump | L280, L8, flexipack | Solaris 2.5, 2.6, 7 |
| Windows NT 4.0 | L1000, L1800, L3500, L11000, L280, L9 | In some cases EEROM may need changing, test first |
It is very important to educate users on correct tape cartridge handling procedures. Quantum has created a complete tape cartridge handling procedure that is strongly recommended to all customers or computer site supervisors, using any of the DLT tapes. To get a copy of the tape cartridge handling procedure, go to the Quantum web page at http://www.quantum.com/support/dlt/dlt_support.htm The tape handling procedure is included with most new DLT firmware patches that have been released. In general, avoid bringing the tape cartridge close to any magnet and when passing through airport security, it is better to pass the recorded tape through the X-ray machines with your luggage instead of the individual magnetic sensors used for people to pass through. X-ray's do not affect magnetic recodings while magnetic sensors may.
Note: Cleaning Tape III is good for about 20 cleanings. The DLT drives do not require periodic cleaning. If the clean LED is lit up and stays on, even when other tapes are loaded, this could be an indication for head cleaning. Once the drive is cleaned do not clean repetitively as this will only damage the head. If the clean LED comes on too frequently, either the tapes being used are bad or the drive requires another type of service (Example: need to upgrade to the latest firmware revision or the drive may be marginal and may need replacing). Also, if the ISV has its cleaning function option enabled, then the library's auto-clean must be disabled.
Here are some simple rules to follow:
** DO NOT IGNORE THIS INDICATOR, BACKUP FAILURE MAY RESULT
To clear this indicator, try the following first:
If the light still remains "ON":
If the light REMAINS "ON" after the cleaning routine has been run:
Two passes of the DLT cleaning tape should be run and a different data cartridge should be tried before it is decided that the DLT tape drive needs service. Repeat occurrences of the "USE CLEANING TAPE" light with different data cartridges may indicate a problem that requires service.
The symptoms for a bad cartridge that could cause drop leader are:
For the DLT7000 drives, firmware version v85 or later have been released to help with `drop leader' issues. However, it has been observed, that the following aspects contribute to `drop leader' issues.
If the cartridge is the cause for the `drop leader', the user has to pay attention and root out the cartridge immediately before this same cartridge is attempted to be loaded into another drive. If an attempt is made to load such a cartridge into a good drive, trying to recover data, the same `drop leader' may occur on the good drive. Sometimes, users may complain that they continue to get `drop leaders' after replacing the drive(s), when it is really the bad tape cartridge left in the library slots causing the leader drops. It is recommended that when a `drop leader' occurs in a drive, that all of the cartridges in the library be carefully examined before continuing operation.
These are the things to look for when examining a cartridge:
It takes about 10 seconds or so to examine a cartridge. A `swallowed leader', is when the `loop formed tip' of the tape disappears inside the cartridge and the leader will have nothing to hook onto and pull the tape out and wind it on the take up reel. If a `drop leader' occurs, it is recommended that the drive be replaced and sent for reattachement of the leader or replacement. The leader is found inside the drive and it is approximately 14 inches long. It is made of a very tough black plastic material the same width as the tape and has a kind of hook type formation at its tip to hook onto the tape loop and thread the tape on the take up reel.
This is how a good `leader tape' looks:

This is a worn out leader with a broken hook tip:

It is easy to recognize when a leader is dropped. With the tape cartridge removed look inside the drive through the cartridge gate. If the leader is still attached, a black tape leader coming from the left and attached to a post or hook can be seen. If the leader is dropped, there will be no sign of any black tape leader anywhere, since the tape leader will have been wrapped around the take up reel. Gain experience by looking at a good drive and see how the leader is attached. Generally speaking, with v85 or later firmware and good cartridge handling by the user, `drop leader' issues should become a very rare occurrence. It has been asked if the leader tape can be replaced or reattached in the field. It is not difficult to replace or reattach a leader. An experienced person using simple tools and a spring hook can replace or reattach a dropped leader in about 5 minutes after removing the top dust cover and breaking the warranty seal at the back. It is not recommended to work on a dropped leader in the field if a replacement drive can be obtained within a few hours because of possible warranty issues. The decision would be left to the user or depot manager to consider warranty issues, experience and criticality of the situation.
The following utilities and commands are available and will also be supplied with every firmware patch as needed. These commands and utilities can also be found in the Tape Command Pool & Utilities (TCP & U) patch
| Name | Command, Document, Driver or Utility | Description |
|---|---|---|
| inquiry | Command | Used for SCSI bus interrogation via the st driver |
| tload | Utility | Used for firmware download to the DLT drive ONLY, not for the autoloader |
| dltprops | Utility | Used to list or change EEPROM bits after downloading firmware to the DLT drive |
| L280_dnld | Utility | Used to download autoloader firmware to the robotics of the L280 ONLY |
| sg-drv.tar.Z | Driver | sg driver needed before using the L280_dnld utility |
| sgscan | Command | Does the same interrogation of the SCSI bus as inquiry, except via the sg driver |
| Tape-Handl_Proc_2.pdf | Document | Quantum's Tape Handling Procedure document |
| Tapelib | Utility | ATL utility for PC DOS compatibles, uses serial port for ATL robotics firmware download. This is a set of 13 files that will run only on a PC after installation. Will not run on a Sun system. |
| L11000 | |||||
|---|---|---|---|---|---|
| Patch ID Number | Bug ID Number | Product | Issue | Remarks | ECR/Remarks |
| 108406-01 | none | L11000 (L320) Robotics | Enhancement | 1.12p3, see changes under robotics firmware changes | -- |
| --- | --- | L11000 (L320) Robotics |
v1.45 |
Released | |
| L3500 | |||||
|---|---|---|---|---|---|
| Patch ID Number | Bug ID Number | Product | Issue | Remarks | ECR/Remarks |
| NBU |
|
L3500 | downs drives | NBU patch needed | � |
| 107590-01 |
|
L3500 robotics and DLT drive | Frequent tape cleaning messages with NBU 3.1.1 | Problem found with DLT7000 drive firmware v72 and robotics firmware. Solution: install patch shown | discnt |
| 108602-01 | � | L3500 robotics | Enhancement firmware n_2.40 | Solves 2.40p1 introduced problem with autoloader which is encountered if library is full. Solves problem in initialize element status with range, which is found when the range specified is more than the number of elements in the library | Released |
| L1800 | |||||
|---|---|---|---|---|---|
| Patch ID Number | Bug ID Number | Product | Issue | Remarks | ECR/Remarks |
| 108094-01 |
|
L1800 robotics & DLT drive | Frequent tape cleaning messages with NBU 3.1.1 | Problem found with DLT7000 drive firmware v72 and robotics firmware. Solution: install patch shown, apply autoloader firmware 2.32 | obsoleted |
| 108094-01 |
|
L1800 | Leader drop | Apply firmware v85 | discnt |
| 108094-01 |
|
L1800 robotics | Load port issue | Apply autoloader firmware 2.32 | discnt |
| 108094-01 |
|
L1800 robotics | Tape cal. algorithm | Apply robotics firmware 2.21 (latest is 2.32) | discnt |
| 108094-01 | none | L1800 robotics | Enhancement | s2_32p1, see changes under robotics firmware | discnt |
| 108598-01 | none | L1800 robotics | Enhancement | s_2_34V (2.34) | Released 1/18/00, had dependency to 108437-01 |
| L1000 | |||||
|---|---|---|---|---|---|
| Patch ID Number | Bug ID Number | Product | Issue | Remarks | ECR/Remarks |
| --- | none | L1000 robotics | none | none | none |
| L400 / DLT4700 | |||||
|---|---|---|---|---|---|
| Patch ID Number | Bug ID Number | Product | Issue | Remarks | ECR/Remarks |
| 107592-01 |
|
DLT4700, DLT4000 | probe-scsi-all response error, unable to configure drive | This was a firmware bug. Apply patch shown for both DLT4700 and DLT4000 | Released |
| L280 | |||||
|---|---|---|---|---|---|
| Patch ID Number | Bug ID Number | Product | Issue | Remarks | ECR/Remarks |
| 107593-01 |
|
L280 robotics | Tape does not go to original slot | Apply patch to change firmware from 2.07 to 2.08. Use latest firmware 2.09, not 2.08 | discnt |
| 107593-01 |
|
L280 robotics | err 97h or A4h move time out | Apply patch to change firmware from 2.07 to 2.08. Use latest firmware 2.09, not 2.08 | discnt |
| NO |
|
L280 robotics | Fail to load autoloader firmware | Used 32 bit mode system not 64 bit | � |
| 108407-01 | none | L280 robotics | Enhancement | Solves FUP via GUI (firmware 2.09) | Released |
| L9 | |||||
|---|---|---|---|---|---|
| Patch ID Number | Bug ID Number | Product | Issue | Remarks | ECR/Remarks |
| none� | �none | L9 | �none | none� | �none |
| L20 | |||||
|---|---|---|---|---|---|
| Patch ID Number | Bug ID Number | Product | Issue | Remarks | ECR/Remarks |
| none | none | L20 | none | none | � |
| DLT Drives | |||||
|---|---|---|---|---|---|
| Patch ID Number | Bug ID Number | Product | Issue | Remarks | ECR/Remarks |
| NO |
|
DLT4000 | Density Issue | Do not use ST_MODE_SEL_COMP | � |
| 108418-01 | none | Desktop DLT7000 | Enhancement | v85, see changes in patch | Released |
| 107592-01 |
|
DLT4700, DLT4000 | probe-scsi-all response error, unable to configure drive | This was a firmware bug. Apply patch shown for both DLT4700 and DLT4000 | Released |
| 108437-01 | none | DLT7000 | Enhancement | firmware d7oml4.v95 upgrade, see infodoc 21294 for change description (L1000, L1800, L3500, L11000) | 16283 16239 Released |
Example serial number:
xx 7 23 S 0246
| Example Serial Number: xx 7 23 S 0246 | ||
|---|---|---|
| Serial Number Field | Definition | Options |
| xx | Place of manufacture |
CX = Colorado Springs USA SH = Shrewsbury USA |
| 7 | Year of manufacture | Last digit of the year manufactured |
| 23 | Calendar week of manufacture | 1 to 52 weeks in a year |
| S | Drive type |
F = DLT2000 T = DLT2000XT M = DLT4000 R = DLT4000E S = DLT7000 P = DLT8000 |
| 0246 | 4 digit serial number | An `A' in the thousands place indicates 10,000 |
Example Model Number:
THNPQ -- SY
| Example Model Number: THNPQ -- SY | ||
|---|---|---|
| Model Number Field | Description | Options |
| T | Tape Drive | � |
| H | Business designation | � |
| N | Drive capacity |
3 = 15/30GB DLT2000XT 4 = 10/20GB DLT2000 5 = 20/40GB DLT4000 6 = 35/70GB DLT7000 8 = 40/80GB DLT8000 X = Media accessories |
| P | Configuration variant |
A = Embedded drive B = Table top L = Library drive X = LDR/LIB drive (no handle motor) |
| Q | SCSI interface type |
A = Single-ended (SE) (4 pin power)
B = Differential (HVD) (4 pin power)
C = Single-ended (SE) (14 pin power)
D = Differential (HVD) (14 pin power)
E = DLT7000 Single-ended with 8mb cache
F = DLT7000 Differential with 8mb cache
For DLT4000: A = Single-end (4/14 pin power) B = Differential (4/14 pin power) |
| SY | Vendor use | Customer variant |
Note: For `Q' definition, E and F designate a DLT7000 with 8mb cache. When nothing is listed, it indicates the drive has 4mb cache. The DLT4000 drives have 4mb cache.
The `Axxx' Error codes generated by the drive are stored in the drive itself and can be read out using the Quantum's DLTtools diagnostic utility. This utility and manual can be downloaded from Quantum's web page at:
http://www.quantum.com/support/csr/software/csr_software.htm
WARNING: Any consequences of using this software are the sole responsibility of the user (This utility is DOS-based and does not run on Sun platforms).
The drive will store the last 14 events.
| Drive Level Internal Error Codes | |
|---|---|
| Error Code | Description |
| A400 | Hard Read error |
| A401 | Hard Write error |
| A402 | Drive error |
| A403 | Loader error |
| A404 | Calibration Log #1 |
| A405 | Calibration Log #2 (Not used on DLT7000) |
| A406 | EDC error detected by SCSI port code |
| A407 | DIR Read Fail (Event log) |
| A408 | DIR Write (from BOT) Retry(s) (Event log) |
| A409 | Unload Info/Statistics |
| A40A | Calibration Info Summary log |
| A40B | Media Quality log |
| A40C | BandAid for spurious Eject |
| A40D | DIR Write (on Unload) Retry(s) Fail (Event log) |
| A40E | DIR Write (after Read) Retry(s) (Event log) |
| A40F | DIR Red Retry(s) (Event log) |
To extract the above error codes from the drives log page 07, the following will be needed:
| SCSI, System Level Status Codes | |
|---|---|
| Code | Description |
| 00h | Good |
| 02h | Check condition |
| 04h | Condition met |
| 08h | Busy |
| 10h | Intermediate |
| 14h | Intermediate condition met |
| 18h | Reservation conflict |
| 22h | Command terminated |
| 28h | Command full |
| SCSI, System Level Sense Keys | ||
|---|---|---|
| Code | Description | |
| 0h | No sense - Check the file mark/EOM/ILI bits and ASC/Q bytes | |
| 1h | Recovered error - Drive can continue to function normally | |
| 2h | Not ready - The drive/media is not ready for tape operation | |
| 3h | Medium error - An unrecoverable write, read or positioning error occurred | |
| 4h | Hardware error - The ASC & ASCQ may provide more information on the error | |
| 5h | Illegal request - The CDB or parameter data received by the drive is not supported | |
| 6h | Unit attention - When reset or media has been changed notification | |
| 7h | Data protect - Current media is data protected, check write protect tab on media | |
| 8h | Blank check - An EOD or long Gap on the tape has been encountered | |
| Bh | Command aborted - When the command is aborted by the drive, see the ASC | |
| Dh | Volume overflow - Physical end of media has been reached during write | |
| Eh | Miscompare - A compare error has occurred during reading | |
Legend (SCSI level error codes definitions):
SUBMITTER: Baios Thomas BUG REPORT ID: 4226984, 4205252, 4174014, 4196452, 4168462, 4183614, 4183117, 4205252, 4174014, 4196452, 4168462, 4183614, 4183117, 4207078, 4156174, 4230311, 4171232, 4204181, 4210895, 4226759, 4244325, 4191808, 4171232 PATCH ID: 108409-01, 108409-01, 108409-01 APPLIES TO: Hardware, Hardware/Tape Storage Subsystem, Hardware/Tape Storage Subsystem/DLT Auto Changers/DLT4000, Hardware/Tape Storage Subsystem/DLT Auto Changers/DLT4700, Hardware/Tape Storage Subsystem/DLT Auto Changers/DLT7000, Hardware/Tape Storage Subsystem/StorEdge Tape Library/StorEdge L280, Hardware/Tape Storage Subsystem/StorEdge Tape Library/StorEdge L400, Hardware/Tape Storage Subsystem/StorEdge Tape Library/StorEdge L1000, Hardware/Tape Storage Subsystem/StorEdge Tape Library/StorEdge L1800, Hardware/Tape Storage Subsystem/StorEdge Tape Library/StorEdge L3500, Hardware/Tape Storage Subsystem/StorEdge Tape Library/StorEdge L11000, AFO Vertical Team Docs/Storage ATTACHMENTS: