UFS Logging
UFS logging is the process of storing transactions (changes that make up a complete UFS operation) in a log before the transactions are applied to the UFS file system. Once a transaction is stored, the transaction can later be applied to the file system later.
At reboot, the system discards incomplete transactions, but applies the transactions for completed operations. The file system remains consistent because only completed transactions are ever applied. This consistency remains even when a system crashes, which normally interrupts system calls and introduces inconsistencies into a UFS file system.
UFS logging provides two advantages:
Prevents file systems from becoming inconsistent, therefore eliminating the need to run the fsck command. And, because fsck checking can be bypassed, UFS logging reduces the time required to reboot a system if it crashes, or after an unclean halt (see "What the fsck Command Checks and Tries to Repair" for details on unclean halts).
UFS logging can significantly reduce the boot time on systems with large file systems, which usually take a long time to read and verify with the fsck command.
The log created by UFS logging is continually flushed as it fills up. The log is flushed when the file system is unmounted or as a result of the lockfs -f command.
UFS logging is not enabled by default. To enable UFS logging, you must specify the -o logging option with the mount command in the /etc/vfstab file or when you mount the file system manually. The log is allocated from free blocks on the file system, and it is sized at approximately 1 Mbyte per 1 Gbyte of file system, up to a maximum of 64 Mbytes. Logging can be enabled on any UFS file system, including the root (/) file system. Also, the fsdb command now has new debugging commands to support UFS logging.
Planning UFS File Systems
When laying out file systems, you need to consider possible conflicting demands. Here are some suggestions:
Distribute the work load as evenly as possible among different I/O systems and disk drives. Distribute the /export/home file system and swap space evenly across disks.
Keep pieces of projects or members of groups within the same file system.
Use as few file systems per disk as possible. On the system (or boot) disk, you should have three file systems: root (/), /usr, and swap space. On other disks, create one or, at most, two file systems; one being additional swap space, preferably. Fewer, roomier file systems cause less file fragmentation than many small, over-crowded file systems. Higher-capacity tape drives and the ability of the ufsdump command to handle multiple volumes make it easier to back up larger file systems.
If you have some users who consistently create very small files, consider creating a separate file system with more inodes. However, most sites do not need to keep similar types of user files in the same file system.
For information on default file system parameters as well as procedures for creating new UFS file systems, see Chapter 38, Creating File Systems (Tasks).
UFS Direct Input/Output (I/O)
Direct I/O is intended to boost bulk I/O operations. Bulk I/O operations use large buffer sizes to transfer large files (larger than 256 Kbytes).
Using UFS direct I/O might benefit applications, such as database engines, that do their own internal buffering. Starting with the Solaris 8 1/01 release, UFS direct I/O has been enhanced to allow the same kind of I/O concurrency seen when accessing raw devices. Now you can get the benefit of file system naming and flexibility with very little performance penalty. Check with your database vendor to see if they can enable UFS direct I/O in their product configuration options.
Direct I/O can also be enabled on a file system by using the forcedirectio option to the mount command. Enabling direct I/O is a performance benefit only when a file system is transferring large amounts of sequential data.
When a file system is mounted with this option, data is transferred directly between a user's address space and the disk. When forced direct I/O is not enabled for a file system, data transferred between a user's address space and the disk is first buffered in the kernel address space.
The default behavior is no forced direct I/O on a UFS file system. For more information, see mount_ufs(1M).
Mounting and Unmounting File Systems
Before you can access the files on a file system, you need to mount the file system. When you mount a file system, you attach that file system to a directory (mount point) and make it available to the system. The root (/) file system is always mounted. Any other file system can be connected or disconnected from the root (/) file system.
When you mount a file system, any files or directories in the underlying mount point directory are unavailable as long as the file system is mounted. These files are not permanently affected by the mounting process, and they become available again when the file system is unmounted. However, mount directories are typically empty, because you usually do not want to obscure existing files.
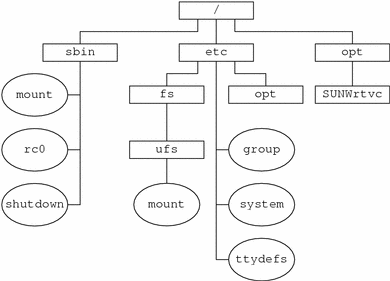
For example, the following figure shows a local file system, starting with a root (/) file system and the sbin, etc, and opt subdirectories.
Figure 37-1 Sample root (/) File System

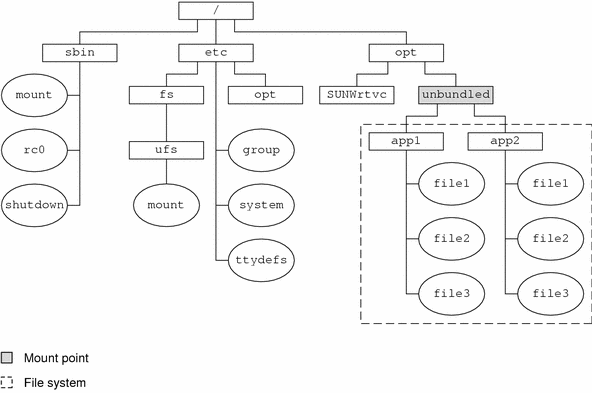
To access a local file system from the /opt file system that contains a set of unbundled products, you must do the following:
First, you must create a directory to use as a mount point for the file system you want to mount, for example, /opt/unbundled.
Once the mount point is created, you can mount the file system (by using the mount command), which makes all of the files and directories in /opt/unbundled available, as shown in the following figure.
For step-by-step instructions on how to mount file systems, see Chapter 39, Mounting and Unmounting File Systems (Tasks).
Figure 37-2 Mounting a File System

The Mounted File System Table
Whenever you mount or unmount a file system, the /etc/mnttab (mount table) file is modified with the list of currently mounted file systems. You can display the contents of this file with the cat or more commands, but you cannot edit it. Here is an example of an /etc/mnttab file:
$ more /etc/mnttab /dev/dsk/c0t0d0s0 / ufs rw,intr,largefiles,onerror=panic,suid,dev=2200000 938557523 /proc /proc proc dev=3180000 938557522 fd /dev/fd fd rw,suid,dev=3240000 938557524 mnttab /etc/mnttab mntfs dev=3340000 938557526 swap /var/run tmpfs dev=1 938557526 swap /tmp tmpfs dev=2 938557529 /dev/dsk/c0t0d0s7 /export/home ufs rw,intr,largefiles,onerror=panic,suid,dev=2200007 ... $ |
The Virtual File System Table
It would be a very time-consuming and error-prone task to manually mount file systems every time you wanted to access them. To avoid this problem, the virtual file system table (the /etc/vstab file) provides a list of file systems and how to mount them.
The /etc/vfstab file provides two important features:
You can specify file systems to automatically mount when the system boots.
You can mount file systems by using only the mount point name, because the /etc/vfstab file contains the mapping between the mount point and the actual device slice name.
A default /etc/vfstab file is created when you install a system, depending on the selections you make when installing system software. However, you can edit the /etc/vfstab file on a system whenever you want. To add an entry, the main information you need to specify is the device where the file system resides, the name of the mount point, the type of the file system, whether you want the file system to mount automatically when the system boots (by using the mountall command), and any mount options.
The following is an example of an /etc/vfstab file. Comment lines begin with #. This example shows an /etc/vfstab file for a system with two disks (c0t0d0 and c0t3d0).
$ more /etc/vfstab #device device mount FS fsck mount mount #to mount to fsck point type pass at boot options /dev/dsk/c0t0d0s0 /dev/rdsk/c0t0d0s0 / ufs 1 no - /proc - /proc proc - no - /dev/dsk/c0t0d0s1 - - swap - no - swap - /tmp tmpfs - yes - /dev/dsk/c0t0d0s6 /dev/rdsk/c0t0d0s6 /usr ufs 2 no - /dev/dsk/c0t3d0s7 /dev/rdsk/c0t3d0s7 /test ufs 2 yes - $ |
In the preceding example, the last entry specifies that a UFS file system on the /dev/dsk/c0t3d0s7 slice will be automatically mounted on the /test mount point when the system boots. Note that, for root (/) and /usr, the mount at boot field value is specified as no, because these file systems are mounted by the kernel as part of the boot sequence before the mountall command is run.
For descriptions of each of the /etc/vfstab fields and information on how to edit and use the file, see Chapter 39, Mounting and Unmounting File Systems (Tasks).


