Example - Setting up a Solaris DHCP Client as an NIS+ Client
The following example assumes that you have one workstation, nisei, which is a NIS+ client in the NIS+ domain dev.example.net, and one DHCP client, dhow, that you want to be a NIS+ client.
(first log in as root on the NIS+ server) # nisgrep nisei cred.org_dir > /tmp/nisei-cred # cat /tmp/nisei-cred nisei.dev.example.net.:DES:unix.nisei@dev.example.net:46199279911a84045b8e0 c76822179138173a20edbd8eab4:90f2e2bb6ffe7e3547346dda624ec4c7f0fe1d5f37e21cff63830 c05bc1c724b # nistbladm -a cname="dhow@dev.example.net." \ auth_type=DES auth_name="unix.dhow@dev.example.net" \ public_data=46199279911a84045b8e0c76822179138173a20edbd8eab4 \ private_data=90f2e2bb6ffe7e3547346dda624ec4c7f0fe1d5f37e21cff63830\ c05bc1c724b # rlogin dhow (log in as root on dhow) # rcp nisei:/var/nis/NIS_COLD_START /var/nis # rcp nisei:/etc/.rootkey /etc # rcp nisei:/etc/defaultdomain /etc # cp /etc/nsswitch.nisplus /etc/nsswitch.conf # reboot |
The DHCP client system dhow should now be able to use NIS+ services.
Adding Credentials With a Script
If you want to set up a large number of DHCP clients as NIS+ clients, you can write a script to quickly add the entries to the cred table. The following sample shows how this might be done.
Example 10-2 Sample Script for Adding Credentials for DHCP Clients
Converting to a New Data Store
Solaris DHCP provides a utility to convert the DHCP configuration data from one data store to another. You may need to convert to a new data store if, for example, your number of DHCP clients increases to the point that you need higher performance or higher capacity from the DHCP service, or if you want to share the DHCP server duties among multiple servers. See "Choosing the Data Store" for a comparison of the relative benefits and drawbacks of each type of data store.
Note - If you upgraded from a Solaris release older than the Solaris 8 7/01 release on the DHCP server system, the first time you run any Solaris DHCP management tool after Solaris installation, you are prompted to convert your DHCP data tables to the new data store. The conversion is required because the format of the data stored in both files and NIS+ changed in the Solaris 8 7/01 release. If you do not convert to the new data store, the DHCP server continues to read the old data tables to extend leases for existing clients. You cannot register new DHCP clients or use management tools with the old data tables.
The conversion utility is also useful for sites converting from a Sun-provided data store to a third-party data store. The conversion utility looks up entries in the existing data store and adds new entries that contain the same data to the new data store. Data store access is implemented in separate modules for each data store, which enables the conversion utility to convert DHCP data from any data store format to any other data store format, provided each data store has a module. See Solaris DHCP Service Developer's Guide for more information about how to write a module to support a third-party data store.
The data store conversion can be accomplished with DHCP Manager through the Data Store Conversion wizard, or with the dhcpconfig -C command.
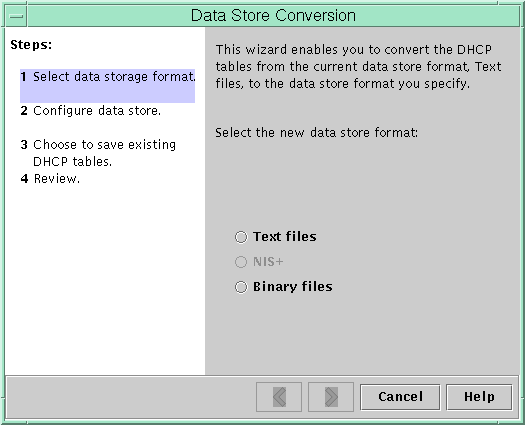
The initial dialog box of the Data Store Conversion wizard is shown in the following figure.
Figure 10-19 Data Store Conversion Wizard Dialog Box

Before the conversion begins, you must specify whether to save the old data store's tables (dhcptab and network tables) . The conversion utility then stops the DHCP server, converts the data store, and restarts the server when the conversion has completed successfully. If you did not specify to save the old tables, the utility deletes them after it determines the conversion is successful. The process of converting can be time-consuming, so the conversion runs in the background with a meter to inform you of its progress.
 How to Convert the DHCP Data Store (DHCP Manager)
Choose Convert Data Store from the Service menu.
The Data Store Conversion wizard opens.
Answer the wizard's prompts.
If you have trouble providing the requested information, click Help to view detailed information about each dialog box.
 How to Convert the DHCP Data Store (dhcpconfig -C)
Become superuser or a user assigned to the DHCP Management profile.
Type a command of the following format:
# /usr/sbin/dhcpconfig -C -r resource -p path
where resource is the data store (such as SUNWbinfiles) and path is the path to the data (such as /var/dhcp).
Note that if you want to keep the original data (in the old data store) after the conversion, specify the -k option.
Moving Configuration Data Between DHCP Servers (Task Map)
The DHCP Manager and dhcpconfig utilities enable you to move some or all the DHCP configuration data from one Solaris DHCP server to another. You can move entire networks and all the addresses, macros, and options associated with it, or select specific IP addresses, macros, and options to move. You can also copy useful macros or options without removing them from the first server when you specify to keep the data on the server.
You might want to move data if you are going to do any of the following tasks:
Add a server to share DHCP duties
Replace the DHCP server's system
Change the path for the data store (while still using the same data store)
The following task map identifies the procedures you must perform when you move DHCP configuration data.
Task | Description | Instructions |
|---|---|---|
1. Export the data from the first server | Select the data you want to move to another server and create a file of exported data. | |
2. Import the data to the second server | Copy exported data to another DHCP server's data store. | |
3. Modify the imported data for the new server environment | Change server-specific configuration data to match the new server's information. |
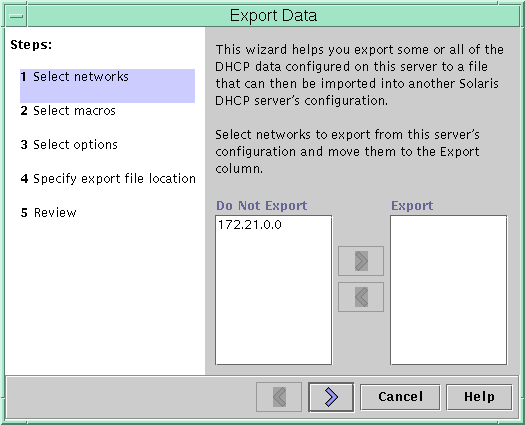
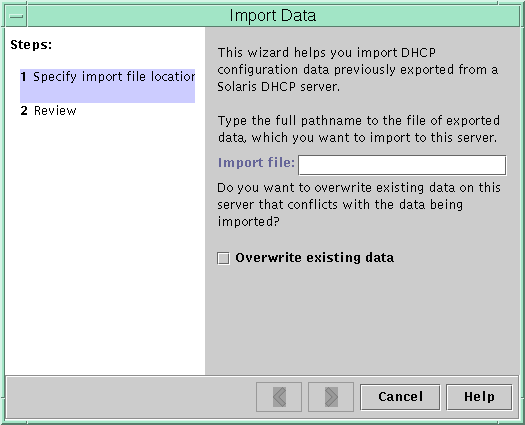
In DHCP Manager, you use the Export Data wizard and Import Data wizard to move the data from one server to the other, and modify macros in the Macros tab. The following figures show the initial dialog boxes for the wizards.
Figure 10-20 Export Data Wizard Dialog Box

Figure 10-21 Import Data Wizard Dialog Box


