Administering NIS+ Directories
This chapter describes NIS+ directory objects and how to administer them.
Note - NIS+ might not be supported in a future release. Tools to aid the migration from NIS+ to LDAP are available in the Solaris 9 operating environment (see Part V). For more information, visit http://www.sun.com/directory/nisplus/transition.html.
NIS+ Directories
NIS+ directory objects are used to store information related to an NIS+ domain. For each NIS+ domain, there is a corresponding NIS+ directory structure. See Chapter 2, NIS+: An Introduction, for more information about NIS+ directories.
For a complete description of NIS+ directory-related commands and their syntax and options, see the NIS+ man pages.
Using the niscat Command With Directories
The niscat -o command can be used to list the object properties of an NIS+ directory. To use it, you must have read access to the directory object itself.
Listing the Object Properties of a Directory
To list the object properties of a directory, use niscat -o and the directory's name:
niscat -o directory-name |
For example:
rootmaster# niscat -o doc.com. Object Name : doc Owner : rootmaster.doc.com. Group : Domain : Com. Access Rights : r---rmcdr---r--- Time to Live : 24:0:0 Object Type : DIRECTORY . . |
Using the nisls Command With Directories
The nisls command lists the contents of an NIS+ directory. To use it, you must have read rights to the directory object.
To display in terse format, use:
nisls [-dgLmMR] directory-name |
To display in verbose format, use:
nisls -l [-gm] [-dLMR] directory-name |
Table 18-1 Options for the nisls Command
Option | Purpose |
|---|---|
-d | Directory object. Instead of listing a directory's contents, treat it like another object. |
-L | Links. If the directory name is actually a link, the command follows the link and displays information about the linked directory. |
-M | Master. Get the information from the master server only. Although this provides the most up-to-date information, it may take longer if the master server is busy. |
-R | Recursive. List directories recursively. That is, if a directory contains other directories, their contents are displayed as well. |
-l | Long. Display information in long format. Long format displays an object's type, creation time, owner, and access rights. |
-g | Group. When displaying information in long format, display the directory's group owner instead of its owner. |
-m | Modification time. When displaying information in long format, display the directory's modification time instead of its creation time. |
Listing the Contents of a Directory--Terse
To list the contents of a directory in the default short format, use one or more of the options listed below and a directory name. If you don't supply a directory name, NIS+ will use the default directory.
nisls [-dLMR] directory-name |
or
nisls [-dLMR] |
For example, this instance of nisls is entered from the root master server of the root domain doc.com.:
rootmaster% nisls doc.com.: org_dir groups_dir |
Here is another example entered from the root master server:
rootmaster% nisls -R sales.doc.com. sales.doc.com.: org_dir groups_dir groups_dir.sales.doc.com.: admin org_dir.sales.doc.com.: auto_master auto_home bootparams cred . |
Listing the Contents of a Directory--Verbose
To list the contents of a directory in the verbose format, use the -l option and one or more of the options listed below. The -g and -m options modify the attributes that are displayed. If you don't supply a directory name, NIS+ will use the default directory.
nisls -l [-gm] [-dLMR] directory-name |
or
nisls -l [-gm] [-dLMR] |
Here is an example, entered from the master server of the root domain doc.com.:
rootmaster% nisls -l doc.com. D r---rmcdr---r--- rootmaster.doc.com. date org_dir D r---rmcdr---r--- rootmaster.doc.com. date groups_dir |
The nismkdir Command
Note - This section describes how to add a nonroot server to an existing domain using the nismkdir command. An easier way to do this is with the nisserver script as described in Chapter 4, Configuring NIS+ With Scripts
The nismkdir command creates a nonroot NIS+ directory and associates it with a master server. (To create a root directory, use the nisinit -r command, described in "The nisinit Command". The nismkdir command can also be used to add a replica to an existing directory.
There are several prerequisites to creating an NIS+ directory, as well as several related tasks.
To create a directory, use:
nismkdir [-m master-server] \ directory-name |
To add a replica to an existing directory, use:
nismkdir -s replica-server \ directory-name nismkdir -s replica-server \ org_dir.directory-name nismkdir -s replica-server \ groups_dir.directory-name |
Creating a Directory
To create a directory, you must have create rights to its parent directory on the domain master server. First use the -m option to identify the master server and then the -s option to identify the replica, use:
nismkdir -m master directory nismkdir -s replica directory |
 Caution - Always run nismkdir on the master server.
Never run nismkdir on the replica machine. Running nismkdir on a replica creates communications problems between the
master and the replica.
This example creates the sales.doc.com. directory and specifies its master server, smaster.doc.com. and its replica, rep1.doc.com.. It is entered from the root master server.
rootmaster% nismkdir -m smaster.doc.com. sales.doc.com. rootmaster% nismkdir -m smaster.doc.com. org_dir.sales.doc.com. rootmaster% nismkdir -m smaster.doc.com. groups_dir.sales.doc.com. rootmaster% nismkdir -s rep1.doc.com. sales.doc.com. rootmaster% nismkdir -s rep1.doc.com. org_dir.sales.doc.com. rootmaster% nismkdir -s rep1.doc.com. groups_dir.sales.doc.com. |

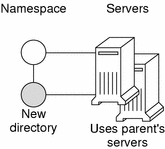
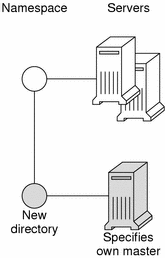
The nismkdir command allows you to use the parent directory's servers for the new directory instead of specifying its own. However, this should not be done except in the case of small networks. Here are two examples:
The first example creates the sales.doc.com. directory and associates it with its parent directory's master and replica servers.
rootmaster% nismkdir sales.doc.com

The second example creates the sales.doc.com. directory and specifies its own master server, smaster.doc.com.
rootmaster% nismkdir -m smaster.doc.com. sales.doc.com. |
Since no replica server is specified, the new directory will have only a master server until you use nismkdir again to assign it a replica. If the sales.doc.com. domain already existed, the nismkdir command as shown above would have made salesmaster.doc.com. its new master server and would have relegated its old master server to a replica.


