Starting the Login Server
The login server is usually started automatically when the system is booted. You can also start the login server from a command line, but you must log in as the root user first.
To set the login server to start when the system Is booted:
# /usr/dt/bin/dtconfig -e |
This will add a S99dtlogin file to your /etc/rc2.d directory. The login server starts automatically when you reboot.
To disable the login server from starting automatically when the system is booted:
# /usr/dt/bin/dtconfig -d |
To start the login server from a command line:
# /usr/dt/bin/dtlogin -daemon; exit |
Note - Although starting the login server from the command line is available for temporary configuration testing, the login server should normally be started when the system is booted.
To kill the login server, Xserver, and the entire Solaris CDE desktop:
# /usr/dt/bin/dtconfig -kill |
For more information about the desktop configuration utility, dtconfig, see Appendix A, dtconfig(1) Man Page. It provides a copy of the dtconfig.1 man page.
To exit the Solaris CDE login screen using the Command Line Login Option:
Choose Command Line Login from the Options menu on the Solaris CDE login screen. After the screen clears, press Return to display a login prompt.

Note - The desktop login daemon will start the desktop login screen automatically after you are finished with the Command Line Login.
To start a single terminal emulation window:
Choose Failsafe Session from the Session submenu of the Options menu on the Solaris CDE login screen.

If you want to leave the Xserver running, choose Failsafe Session from the Session submenu. This will start a single xterm window. The Failsafe Session option is always available, even when the Command Line Login option is not available.
Mounting an Installed CDE from Another Workstation or Network Server Installation Location
You can mount an installed CDE from another workstation or network server installation location if you do not have the required disk space on your workstation, since this procedure does not use your local disk space.
Note - Since the /usr/dt directory structure differs between Solaris releases and client workstations (SPARC directory structure differs for the Intel directory structure), the client workstation must mount the appropriate NFS server /usr/dt image. For example, a SPARC system with Solaris 2.5 would mount /usr/dt from another Solaris 2.5 system with /usr/dt installed CDE.
 To Mount an Installed CDE
Mount a /usr/dt directory from a previously installed workstation or network server to the /usr/dt directory on your workstation.
Type /usr/dt/bin/dtconfig -inetd
Enable the Solaris Desktop Login by typing:
/usr/dt/bin/dtconfig -e
Reboot your workstation.
For more information about the desktop configuration utility, dtconfig, see Appendix A, dtconfig(1) Man Page. It provides a copy of the dtconfig(1) man page.
 To Unmount a Mounted CDE Directory
Disable the Solaris Desktop Login by typing:
/usr/dt/bin/dtconfig -d
Type /usr/dt/bin/dtconfig -inetd.ow
Unmount /usr/dt.
Reboot your workstation.
For more information about the desktop configuration utility, dtconfig, see Appendix A, dtconfig(1) Man Page. It provides a copy of the dtconfig(1) man page.
Configuring Your Desktop To Use Multiple Screens
The standard login starts the desktop on a single screen. You can edit the Xconfig file to have the desktop start on multiple screens. You must be logged in as the root user to change this file.
Note - For faster editing of login configuration information, use the Failsafe Session option to run a single xterm window rather than the whole desktop.
 To Make the Desktop Start on Multiple Screens
Create a copy of the Xserver file by typing the following command and pressing Return:
# cp /usr/dt/config/Xservers /etc/dt/config/Xservers
Note - /etc/dt/config/Xservers overrides /usr/dt/config/Xservers.
Edit the /etc/dt/config/Xservers file to set up two frame buffers (screens):
Choose Reset Login Screen from the Options menu.

Note - When running Solaris CDE on multiple screens, a Front Panel is displayed on each screen. These Front Panels are independent of each other and have separate configuration files.
Networked Desktops
The Solaris CDE Login Manager is network aware. By default, login screens will respond to queries by the Solaris CDE Chooser.
To show the list of remote hosts:
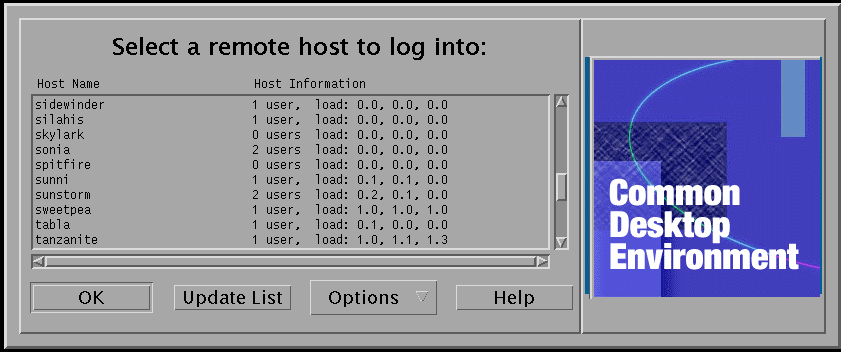
Alternatively, to run the Chooser independently of the login screen, refer to the section "Using Workstations as XTerminals". The following screen shows a typical Chooser list of available servers.

You can select an idle server from the list to use its resources via Chooser to log in to Solaris CDE.
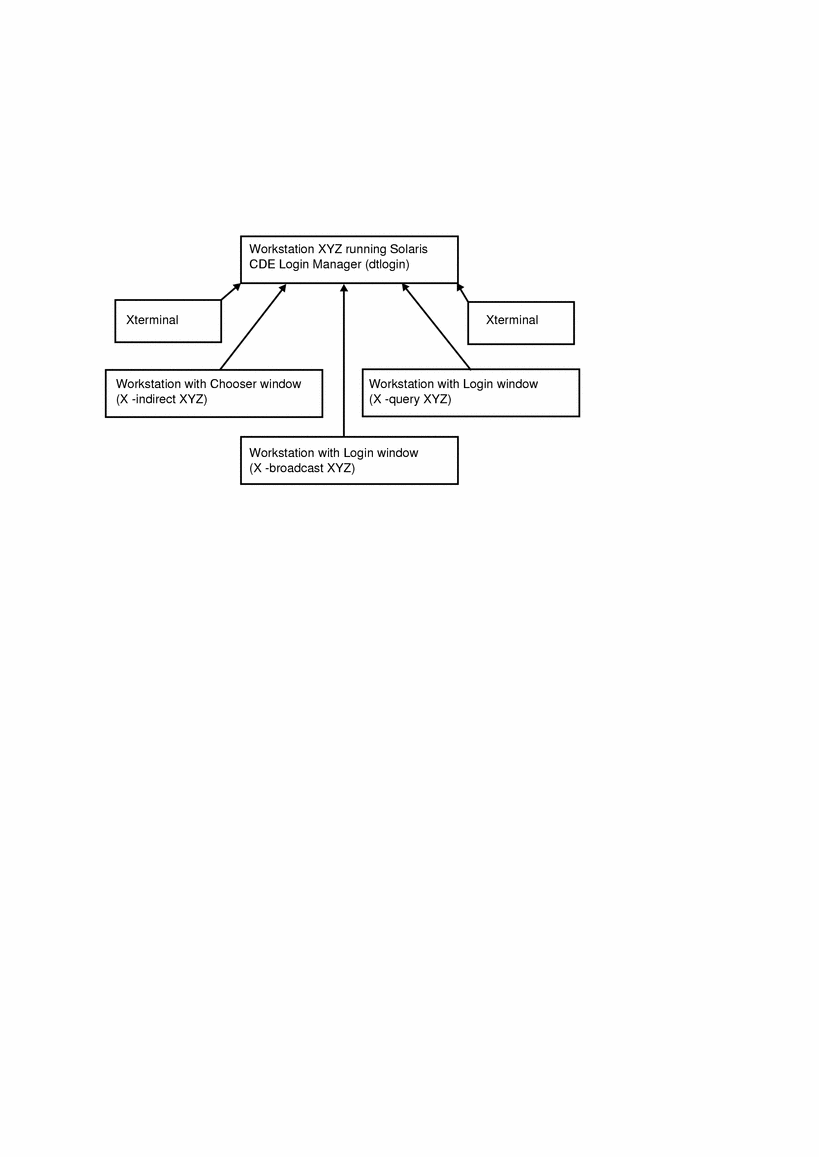
Any networked workstation running the Solaris CDE Login Manager can support both a local desktop user and multiple remote users including Xterminal users using the workstation as a Solaris CDE desktop server. (See Figure 6-1.)
Figure 6-1 Networked Desktops

Note - Figure 6-1 can include a mixed hardware environment.
Using XTerminals
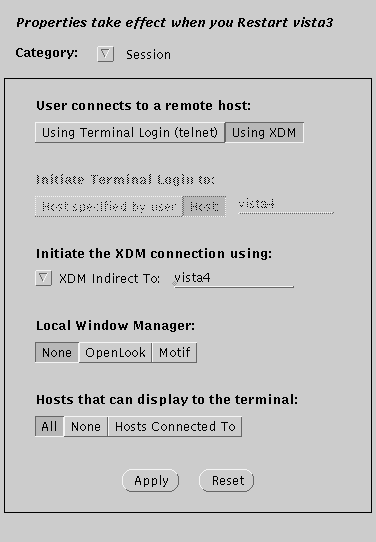
Any Xterminal that supports the XDM protocol can use Chooser to log in to Solaris CDE. To run the Chooser, refer to the section "Using Workstations as XTerminals". The SPARC Xterminal™ software version 2.0 (or later) works well with Solaris CDE. Click Properties on the X-Terminal Controls window and choose Session as the Category to display the setup screen shown in Figure 6-2.
Figure 6-2 Session setup screen

Select None for the Local Window Manager, and XDM Indirect for the XDM connection to the remote system running Solaris CDE.


