| Platform Notes: Ultra 450 Workstation and Ultra Enterprise 450 Server |
|
| Platform Notes: Ultra 450 Workstation and Ultra Enterprise 450 Server |
|
| C H A P T E R 3 |
Disk Drive Hot-Plug Procedures |
The Sun Ultra 450 workstation and Ultra Enterprise 450 server support hot-plugging of internal disk drives. This hot-plug feature enables you to install a new disk drive, or remove and replace a failed disk drive, without shutting down the operating system or powering off the system. The hot-plug procedure involves software commands for preparing the system prior to removing a disk drive and for reconfiguring the operating environment after installing a new drive.
Hot-plug reconfiguration or hot-plug operations cannot be performed on an active disk drive. All disk access activity must be stopped on a disk drive being removed or replaced.
In general, hot-plug reconfiguration operations involve three separate stages:
Preparing for hot-plug reconfiguration
Adding, replacing, or removing a disk drive
Reconfiguring the operating environment.
Three specific cases exist where the hot-plug feature is useful.
Adding a disk drive to a system to increase storage capacity:
See
Adding a Hot-Pluggable Disk Drive
.
Replacing a faulty disk drive while the system is running. See Replacing a Faulty Hot-Pluggable Disk Drive . When you intend to replace a faulty drive, prepare replacement disks ahead of time to simplify replacement later. Each replacement disk should be formatted, labeled, and partitioned the same as the disks to be replaced, and have file systems or other application specific preparation performed.
Removing a drive from a system that no longer needs it:
See
Removing a Hot-Pluggable Disk Drive
.
This section contains information on how to configure your system when you add a disk drive while the power is on and the operating system is running.
The way in which you add a disk drive depends on the application you are using. Each application requires that you decide where to install the new disk drive, add the drive, and then reconfigure the operating environment.
In all cases, you must select a slot, physically install the disk drive, and configure the Solaris environment to recognize the drive. Then you must configure your application to accept the new disk drive.
The system's internal disk array can accommodate up to 20 low-profile UltraSCSI disk drives. The basic system configuration includes support for one to four disk drives connected to a four-slot backplane.
FIGURE 3-1 shows the system's 20 internal disk slots. Disk slots are numbered from 0 to 19. When adding a new disk drive to the system, you should install the drive in the lowest available slot number.
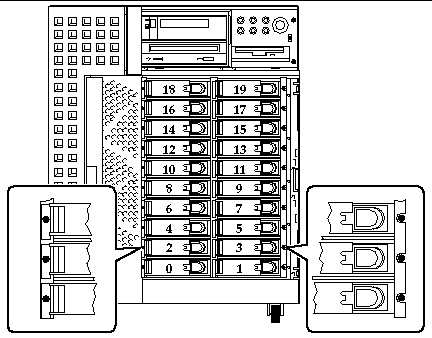
Refer to the Sun Ultra 450 Workstation Owner's Guide or Ultra Enterprise 450 Server Owner's Guide for drive installation instructions.
After physically installing the disk drive, you must create a new device entry for the drive in the
/devices
,
/dev/dsk
, and
/dev/rdsk
hierarchies. The new drive is assigned a logical device name of the form
c
w
t
x
d
y
s
z
, where:
w
corresponds to the SCSI controller for the disk drive
x
corresponds to the SCSI target for the disk drive
y
is the logical unit number for the disk drive (always 0)
z
is the slice (or partition) on the disk
The logical device name assigned to the drive depends on the disk slot number where the drive is installed as well as the PCI slot number that contains the disk's associated UltraSCSI controller card.
1. Use the drvconfig and disks commands to add the new device:
2. To verify that the new disk has been created, type:
The new disk and its logical device name appear at the top of the list. Check the file creation date to make sure it matches the current time and date. In the example above, the logical device name for the new disk is c0t3d0 .
Continue adding the disk by following the instructions for your specific application:
Adding a Disk to a Solstice DiskSuite Disk Set
Use the following procedure to configure a slice (single physical partition) on a disk to be used with a UFS file system. For instructions about adding a file system to a Solstice
 DiskSuite
(SDS) logical disk, refer to the documentation that came with your application.
DiskSuite
(SDS) logical disk, refer to the documentation that came with your application.
1. Verify that the device label meets your requirements.
You can use the prtvtoc command to inspect the label for your disk. To modify the label, use the format command. Refer to the prtvtoc(1M) and format(1M) man pages for more information.
2. Select a disk slice for your UFS file system and create a new file system on the slice:
For example: newfs /dev/rdsk/c0t3d0s2
Refer to the newfs(1M) man page for more information.
3. If necessary, create a mount point for the new file system:
where mount_point is a fully qualified path name. Refer to the mount(1M) man page for more information.
4. After the file system and mount point have been created, modify the /etc/vfstab file to reflect the new file system.
See the vfstab(4) man page for more details.
5. Mount the new file system using the mount command:
where mount_point is the directory you created.
The file system is ready to be used.
You can use any disk you add to the system for Solstice DiskSuite (SDS) new or existing metadevices.
Refer to the Solstice DiskSuite documentation for information on configuring the disk drive.
This section contains information on configuring your system to replace a disk drive while the power is on and the operating system is running.
The way in which you replace a faulty disk drive depends on the application you are using. Each application is different, but requires that you
Determine which disk drive is failing or has failed
Remove the disk
Add the replacement drive
Reconfigure the operating environment.
In all cases you must stop any activity or applications on the disk; unmount it; physically remove the old drive and install the new one; and configure the Solaris environment to recognize the drive. Then you must configure your application to accept the new disk drive.
If possible, prepare replacement disk drives in advance. Each replacement disk drive should be formatted, labeled, and partitioned the same as the disk it will replace. See the documentation for your application for instructions on how to format and partition the disk, and add that disk to your application.
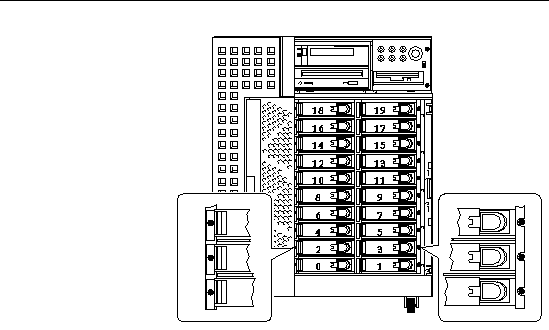
Disk errors may be reported in a number of different ways. Often you can find messages about failing or failed disks in your system console. This information is also logged in the /usr/adm/messages file(s). These error messages typically refer to a failed disk drive by its physical device name (such as /devices/pci@6,4000/scsi@4,1/sd@3,0 ) and its UNIX device instance name (such as sd14 ). In some cases, a faulty disk may be identified by its logical device name, such as c2t3d0 . In addition, some applications may report a disk slot number (0 through 19) or activate an LED located next to the disk drive itself (see FIGURE 3-2 ).
In order to perform a disk hot-plug procedure, you need to know the slot number of the faulty disk (0 through 19) and its logical device name (for example, c2t3d0 ). If you know the disk slot number, it is possible to determine the logical device name, and vice versa. It is also possible to determine both the disk slot number and the logical device name from a physical device name (such as /devices/pci@6,4000/scsi@4,1/sd@3,0 ).
To make the necessary translation from one form of disk identifier to another, see Chapter 4 . Once you have determined both the disk slot number and logical device name, you are ready to continue with this procedure.
Continue the disk replacement by following the instructions for your specific application.
The following procedure describes how to deconfigure a disk being used by one or more UFS file systems.
1. Type su and your superuser password.
2. Identify activities or applications attached to the device you plan to remove.
Commands to use are mount , showmount -a , and ps -ef . See the mount(1M) , showmount(1M) , and ps(1) man pages for more details.
For example, where the controller number is 1 and the target ID is 2 :
In this example, the file system /export/home1 on the faulty disk is being remotely mounted by three different systems-- cinnamon , austin , and swlab1 . The only process running is grep , which has finished.
3. Stop any activity or application processes on the file systems to be deconfigured.
5. Determine what file system(s) are on the disk:
For example, if the device to be removed is c1t2d0 , enter the following:
# mount | grep c1t2 /export/home (/dev/dsk/c1t2d0s7 ): 98892 blocks 142713 files /export/home2 (/dev/dsk/c1t2d0s5 ): 153424 blocks 112107 files |
6. Determine and save the partition table for the disk.
If the replacement disk is the same type as the faulty disk, you can use the format command to save the partition table of the disk. Use the save command in format to save a copy of the partition table to the /etc/format.dat file. This will allow you to configure the replacement disk so that its layout matches the current disk.
Refer to the format(1M) man page for more information.
7. Unmount any file systems on the disk.
For each file system returned, type:
where filesystem is the first field for each line returned in Step 1 .
Refer to the Sun Ultra 450 Workstation Owner's Guide or Ultra Enterprise 450 Server Owner's Guide for instructions on how to remove and replace disk drives.
Use the following procedure to configure a slice on a disk to be used with the UFS file system.
1. Verify that the device's partition table satisfies the requirements of the file system(s) you intend to re-create.
You can use the
prtvtoc
command to inspect the label for your device. If you need to modify the label, use the
format
command. Refer to the
prtvtoc(1M)
and
format(1M)
man pages for more information.
For example:
If you have saved a disk partition table using the format utility and the replacement disk type matches the old disk type, then you can use the format utility's partition section to configure the partition table of the replacement disk. See the select and label commands in the partition section.
If the replacement disk is of a different type than the disk it replaced, you can use the partition size information from the previous disk to set the partition table for the replacement disk. Refer to the prtvtoc(1M) and format(1M) man pages for more information.
You have defined your disk's partition table and have identified the disk slice on which to build your UFS file system.
2. Once you have selected a disk slice for your UFS file system, check and/or create a file system on the slice:
3. Mount the new file system using the mount command:
where mount_point is the directory on which the faulty disk was mounted.
The new disk is ready to be used. You can now restore data from your
backups.
The following procedure describes how to replace a disk in use by Solstice DiskSuite. Refer to the Solstice DiskSuite documentation for more information.
1. Back up your system.
2. Type su and your superuser password.
3. If possible, save the partition table for the disk you intend to replace.
If the disk label can still be read, save the disk partitioning at this time.
|
Note Note - Save all the disk partitioning information immediately after configuring metadevices or file systems for use when recovering from device failure later. |
Use the prtvtoc command to save the partition information.
4. Identify metadevices or applications using the device you plan to remove.
Save the output of the commands to reconstruct the metadevice configuration after you replace the disk.
If there are database replicas on the disk, these must be deleted. First record the size and number of database replicas on each slice; then delete them.
If any slices of the disk are used by submirrors, the submirrors should be detached. For example:
If any slices are used by hotspare pools, remove them. Record the hotspare pools containing the slices; then delete them. For example:
8. Terminate all other metadevice activity on the disk.
Check metastat output for other slices of the disk used by metadevices that cannot be detached (stripes not in mirrors, etc.). These metadevices must be unmounted if they contain file systems, or they must otherwise be taken off line.
Refer to the prtvtoc(1M) man page for more information.
9. Unmount any file systems on the disk.
For each file system returned, type:
where filesystem is the first field for each line returned in Step 1 .
Refer to the Sun Ultra 450 Workstation Owner's Guide or Ultra Enterprise 450 Server Owner's Guide for instructions on how to remove and replace disk drives.
Use the following procedure to configure a slice on a disk to be used with the Solstice DiskSuite system.
1. Restore the disk partitioning.
If you have saved the disk partitioning to a file, you may restore it with fmthard . For example:
If you have not saved the disk partitioning, use the format ( 1M ) or fmthard ( 1M ) commands to repartition the disk.
2. Replace any database replicas.
4. Re-create hotspares for each hotspare pool that contained a slice on the new disk.
5. Fix any broken metadevices, using slices from the new disk.
If the disk to be replaced had caused any metadevices to go into the maintenance state, these metadevices can be repaired by re-enabling the slices.
6. Remount any file systems and restart any applications that were using metadevices that could not be taken off line.
Refer to the Solstice DiskSuite documentation for more information.
This section contains information on how to configure your system to remove a disk drive while the power is on and the operating system is running. Use the procedures in this chapter if you do not intend to replace the disk drive.
The way in which you remove a disk drive depends on the application you are using. Each application is different, but requires that you
In all cases you must select the disk and stop any activity or applications on it, unmount it, physically remove the drive, and configure the Solaris environment to recognize that the drive is no longer there. Then you must configure your application to operate without this device in place.
Disk errors may be reported in a number of different ways. Often you can find messages about failing or failed disks in your system console. This information is also logged in the /usr/adm/messages file(s). These error messages typically refer to a failed disk drive by its UNIX physical device name (such as /devices/pci@6,4000/scsi@4,1/sd@3,0 ) and its UNIX device instance name (such as sd14 ). In some cases, a faulty disk may be identified by its UNIX logical device name, such as c2t3d0 . In addition, some applications may report a disk slot number (0 through 19) or activate an LED located next to the disk drive itself (see FIGURE 3-3 ).

In order to perform a disk hot-plug procedure, you need to know the slot number of the faulty disk (0 through 19) and its logical device name (for example, c2t3d0 ). If you know the disk slot number, it is possible to determine the logical device name, and vice versa. It is also possible to determine both the disk slot number and the logical device name from a physical device name (such as /devices/pci@6,4000/scsi@4,1/sd@3,0 ).
To make the necessary translation from one form of disk identifier to another, see Chapter 4 . Once you have determined both the disk slot number and logical device name, you are ready to continue with this procedure.
Continue the hot disk removal by following the instructions for your specific application:
The following procedure describes how to deconfigure a disk being used by one or more UFS file systems.
1. Type su and your superuser password.
2. Identify activities or applications attached to the device you plan to remove.
Commands to use are mount , showmount -a , and ps -ef . See the mount(1M) , showmount(1M) , and ps(1) man pages for more details.
For example, where the controller number is 1 and the target ID is 2 :
In this example, the file system /export/home1 on the faulty disk is being remotely mounted by three different systems-- cinnamon , austin , and swlab1 . The only process running is grep , which has finished.
3. Stop any activity or application processes on the file systems to be deconfigured.
5. Determine what file system(s) are on the disk:
6. Unmount any file systems on the disk.
For each file system returned, type:
where filesystem is the first field for each line returned in Step 1 .
Refer to the Sun Ultra 450 Workstation Owner's Guide or Ultra Enterprise 450 Server Owner's Guide for instructions on how to remove disk drives.
The following procedure describes how to deconfigure a disk in use by Solstice DiskSuite. For more information, refer to the Solstice DiskSuite documentation.
2. Type su and your superuser password.
3. Identify metadevices or applications using the device you plan to remove.
If there are database replicas on the disk, these must be deleted. For example:
5. Replace slices or clear metadevices.
If any slices of the disk are in use by submirrors or within RAID metadevices, they can be replaced by other available slices. For example:
If there are no replacement slices available, the metadevices must be cleared. For example:
6. Replace slices or clear hotspares.
If any slices of the disk are used by hotspare pools, they can be replaced by other available slices.
7. Unmount any file systems on the disk.
Refer to the Solstice DiskSuite documentation for more information.
Refer to the Sun Ultra 450 Workstation Owner's Guide or Ultra Enterprise 450 Server Owner's Guide for instructions on how to remove disk drives.
| Platform Notes: Ultra 450 Workstation and Ultra Enterprise 450 Server | 806-3992-10 |
|
Copyright © 2002, Sun Microsystems, Inc. All rights reserved.


