 How to Uninstall Software With the Product Registry
Become superuser or assume an equivalent role.
Start the Product Registry tool.
# prodreg
The Solaris Product Registry window is displayed.
To view the list of installed and registered software, click the turner control.
Select directories until you find the name of the software that you want to uninstall.
Read the software attributes to make sure that this software is the software you want to uninstall.
Click the Uninstall software-product-name button at the bottom of the Solaris Product Registry window.
The software product you selected is uninstalled.
Adding and Removing Software Packages With Admintool
The Solaris operating environment includes Admintool, which is a graphical user interface for performing several administration tasks, including adding and removing software packages. Specifically, you can use Admintool to do the following:
Add software packages to a local system
Remove software packages from a local system
View software already installed on the local system
Customize software packages to be installed
Specify an alternate installation directory for a software package
 How to Add Software Packages With Admintool
Become superuser.
Unless you are a member of the sysadmin group (group 14), you must become superuser or assume an equivalent role to add or remove software packages with Admintool.
Load a Solaris 9 Software CD or DVD into the drive.
Volume Manager automatically mounts the CD.
Start Admintool.
# admintool &
The Users window is displayed.
Choose Software from the Browse menu.
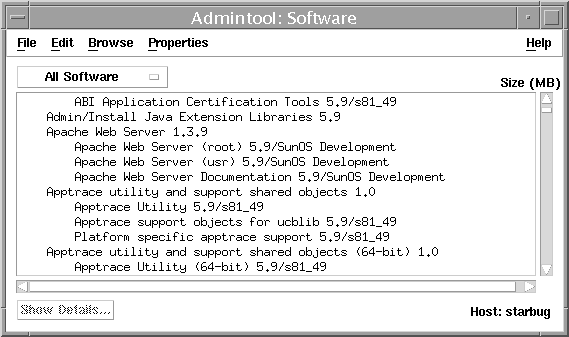
The Software window is displayed.
Choose Add from the Edit menu.
The Set Source Media window might appear. If so, specify the path to the installation media and click OK. The default path is a mounted Solaris CD.
The Add Software window is displayed.

Select the software you want to install on the local system.
In the Software portion of the window, click the check boxes that corresponds to the software you want to install.
Click Add.
A Command Tool window appears for each package being installed, displaying the installation output.
The Software window is refreshed to display the packages just added.
 How to Remove Software Packages With Admintool
Become superuser.
Unless you are a member of the sysadmin group (group 14), you must become superuser or assume an equivalent role to add or remove software packages with Admintool.
Start Admintool.
# admintool &
The Users window is displayed.
Choose Software from the Browse menu.
The Software window is displayed.

Select the software you want to delete from the local system.
Choose Delete from the Edit menu.
A warning pop-up window is displayed to confirm whether you really want to delete the software.
Click Delete to confirm that you want to delete the software.
For each package that is being deleted, a Command Tool window is displayed that asks for confirmation, again, before deleting the software. Type y, n, or q. If you choose to delete the software, the output from the removal process is displayed.
Adding and Removing Software Packages With Package Commands
This section describes how to add, check, and remove packages with the package commands.
 How to Add Software Packages (pkgadd)
Become superuser or assume an equivalent role.
Remove any already installed packages with the same names as the ones you are adding.
This step ensures that the system keeps a proper record of software that has been added and removed. There might be times when you want to maintain multiple versions of the same application on the system. For strategies on maintaining multiple software copies, see "Guidelines for Removing Packages", and for task information, see "How to Remove Software Packages (pkgrm)".
Add a software package to the system.
# pkgadd -a admin-file -d device-name pkgid ...
-a admin-file
(Optional) Specifies an administration file that the pkgadd command should consult during the installation. For details about using an administration file, see "Using an Administration File" in the previous chapter.
-d device-name
Specifies the absolute path to the software packages. device-name can be the path to a device, a directory, or a spool directory. If you do not specify the path where the package resides, the pkgadd command checks the default spool directory (/var/spool/pkg). If the package is not there, the package installation fails.
pkgid
(Optional) Is the name of one or more packages (separated by spaces) to be installed. If omitted, the pkgadd command installs all available packages.
If the pkgadd command encounters a problem during installation of the package, it displays a message related to the problem, followed by this prompt:
Do you want to continue with this installation?
Respond with yes, no, or quit. If more than one package has been specified, type no to stop the installation of the package being installed. The pkgadd command continues to install the other packages. Type quit to stop the installation.
Verify that the package has been installed successfully.
# pkgchk -v pkgid
If there are no errors, a list of installed files is returned. Otherwise, the pkgchk command reports the error.


