


First-Time Use of the User Tool Collection
To install the initial users to their assigned roles, you first log in as yourself. When you authenticate yourself to the Solaris Management Console, specify root user.
 How to Run the User Tool Collection
Log in as a normal user and start the Solaris Management Console.
% whoami
johnDoe
% /usr/sadm/bin/smc&
Navigate to the User Tool Collection and click the icon, as follows:
Find the icon that is labeled This Computer under Management Tools in the navigation pane.
Click the turner icon to its left.
The turner icon is shaped like a lever. When the lever is horizontal, the contents of the folder are hidden. When the lever is vertical, the contents are displayed. Clicking the turner icon toggles the folder between the hidden and displayed states.
Click the turner icon next to the System Configuration folder to display its contents.
Click the User icon to open the User Tool Collection.
The user login dialog box is displayed.
Type root and the root password in the Login: User Name dialog box. Click OK.
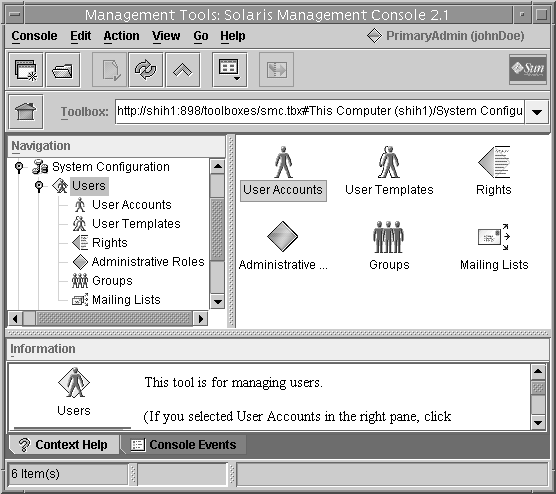
Generally, you should type your user name here and then assume a role. However, for the first time, you need to be root user because no roles exist yet. This step opens the User Tool Collection (see the following figure).
Figure 18-1 The User Tool Collection
Setting Up Initial Users
If all users who are assigned to roles are already installed on this system, you can skip this task and go to "Setting Up Initial Roles".
How to Create Initial Users by Using the User Accounts Tool
Click the User Accounts tool icon in either the navigation pane or the view pane of the User Tool Collection.
The User Accounts tool is started. The Action menu now provides options for this tool.
Select Add User->With Wizard from the Action menu.
This step starts the Add User wizard, a series of dialog boxes that request information that is necessary for configuring a user. Use the Next and Back buttons to navigate between dialog boxes. Note that the Next button does not become active until all required fields have been filled in. The last dialog box is for reviewing the entered data, at which point you can go back to change entries or click Finish to save the new role.
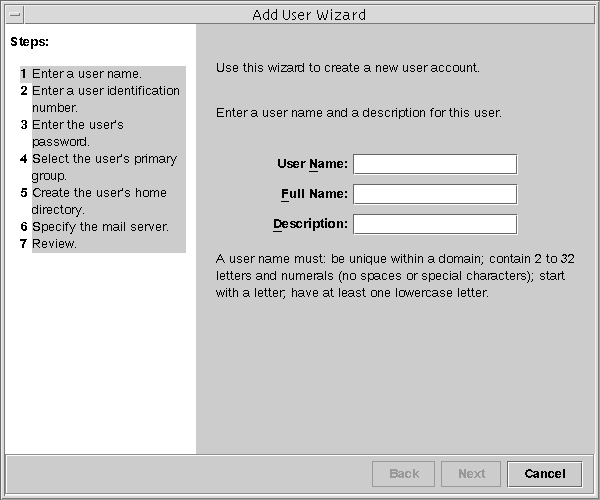
The following figure shows the first dialog box, Step 1: Enter a user name.
Figure 18-2 Add User Wizard
Type the name of the first user and the other identification information.
In the Step 2: Enter a User Identification Number dialog box, type the UID.
This entry should match the existing UID for the user.
In the Step 3: Enter the User's Password dialog box, indicate whether you or the user will be setting the password.
If you are setting up this account for yourself, click the second option. Then, type and confirm your password.
In the Step 4: Select the User's Primary Group dialog box, select the appropriate group.
In the Step 5: Create the User's Home Directory dialog box, specify the path for the home directory.
In the Step 6: Specify the Mail Server dialog box, check out the default mail server and mailbox.
You can change these settings later in the User Properties dialog box.
Check the information in the Review dialog box. Click Finish to save, or click Back to reenter information.
If you discover missing or incorrect information, click the Back button repeatedly to display the dialog box where the incorrect information is displayed. Then, click Next repeatedly to return to the Review dialog box.
Setting Up Initial Roles
The first role to create is the role that is responsible for managing users and roles, typically the Primary Administrator. First, you should install the users and the roles on your local host. After you have set up a toolbox for the name service scope, you need to create the same users and roles in the name service. See "Using the Solaris Management Tools in a Name Service Environment (Task Map)" in System Administration Guide: Basic Administration. After the first role is established and assigned to you, then you can run the console tools by assuming a role instead of becoming root.
How to Create the First Role (Primary Administrator) by Using the Administrative
Roles Tool
To install the first role, you should log in as yourself. When you authenticate yourself to the Solaris Management Console, specify root user. You should first install the role on your local host. After the first role is established and assigned to you, you can run the console tools by assuming a role instead of as root user.
Type root and the root password in the Login: User Name dialog box. Click OK.
Click the Administrative Roles icon in either the navigation pane or the view pane of the User Tool Collection.
The Administrative Roles tool is started. The Action menu now provides options for this tool.
Select Add Administrative Role from the Action menu.
This step starts the Add Administrative Role wizard, a series of dialog boxes that request information that is necessary for configuring a role. Use the Next and Back buttons to navigate between dialog boxes. Note that the Next button does not become active until all required fields have been filled in. The last dialog box is for reviewing the entered data, at which point you can go back to change entries or click Finish to save the new role.
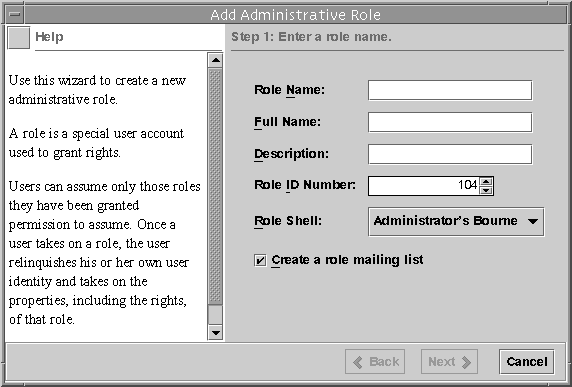
The following figure shows the first dialog box, Step 1: Enter a Role Name.
Figure 18-3 Add Administrative Role Wizard
Type primaryadmin, or whatever role name you are using, and the other identification information.
If you select the role mailing list option, you can create an alias of users who can assume this role.
In the Step 2: Enter a Role Password dialog box, type the password for the new role in the Role Password field and again in the Confirm Password field.
Confirmation helps prevent a misspelled password from being saved.
In the Step 3: Enter Role Rights dialog box, select the Primary Administrator rights profile.
Double-click the Primary Administrator rights profile in the Available Rights column (on the left). The rights profiles in the Granted Rights column (on the right) are the rights profiles that are assigned to this role. In this instance, only the Primary Administrator rights profile is needed.
In the Step 4: Select a Home Directory dialog box, specify the server and path for the home directory.
In the Step 5: Assign Users to This Role dialog box, type the login names for any users to be assigned to the Primary Administrator role.
Any users that you add must be defined in the same name service scope in which you are working. If you selected the role mailing list option in the Step 1: Enter a Role Name dialog box, these users will receive email that is addressed to the Primary Administrator role.
Check the information in the Review dialog box. Click Finish to save, or click Back to reenter information.
If you discover missing or incorrect information, click the Back button repeatedly to display the dialog box where the incorrect information is displayed. Then, click Next repeatedly to return to the Review dialog box.
Open a terminal window, become root, and start and stop the name service cache daemon.
The new role does not take effect until the name service cache daemon is restarted. After becoming root, type as follows:
# /etc/init.d/nscd stop
# /etc/init.d/nscd start