| C H A P T E R 2 |
Creator Graphics Accelerator |
This chapter describes how to change the Creator and Creator 3D Graphics Accelerator screen resolution to work properly with different monitors.
The Creator Graphics Accelerator family consists of three different versions: Series 1, Series 2, and Series 3. The primary difference between each series is screen resolution, but there are other performance differences also. The Creator Series 1 is the base graphics accelerator in the family. The Creator Series 2 offers a performance improvement over the Series 1 and additional screen resolutions. The Creator Series 3 offers the highest performance and the largest number of screen resolutions, plus configurable gamma correction and extended overlay options.
You can change the Creator X11 screen and associated graphics hardware through the ffbconfig utility. Options are specified on the command line. The specified options are stored in the OWconfig file. You use these options to initialize the Creator device the next time Xsun is run on that device. Updating options in the OWconfig file provides persistence of these options across Xsun sessions and system reboots.
|
Note - ffb is the UNIX device name for the Creator family of graphics accelerators. |
Use the ffbconfig utility to specify the following:
For the Creator Series 3, the ffbconfig utility can be used to specify the following additional functions:
The Creator system reads the VESA standard Extended Display Identification Data (EDID) from the monitor to determine the default screen resolution. If the EDID data is not available for the monitor, the monitor ID sense code is used to determine the default screen resolution.
TABLE 2-1 lists the default screen resolutions by monitor ID sense code.
If the Creator system is unable to determine the monitor type, such as for non-Sun monitors, it defaults to a resolution of 1152 x 900 at 66 Hz.
TABLE 2-2 lists the Creator-supported screen resolutions. Some resolutions are supported only on Creator3D Series 2 or later.
Some monitors may not support some the resolutions supported by the Creator system. You can get the list of resolutions supported by the Creator and the connected monitor using the ffbconfig command.
To assure monitor synchronization of supported resolutions, you must install the following Solaris patches before running ffbconfig . TABLE 2-3 lists the required patches:
|
Note - When the ffb and xfb patches are required, you must install both patches as a pair. |
|
 Use the
ffbconfig
command as follows:
ffbconfig -res \? |
You can change the screen resolution temporarily as a test to determine if the monitor supports the specified resolution.
|
Caution - Do not change screen resolution while the window system is running. Changing screen resolution while the window system is running may put the screen display in an unusable state. |
 Use the
ffbconfig
command as follows:
ffbconfig -res video-mode try |
See TABLE 2-2 for the list of video-mode options (see the "Video Mode Format" and "Symbolic Name" columns in the table). You will have five seconds to confirm the video mode by typing y .
ffbconfig -res stereo |
This changes the resolution to 960 x 680 at 112 Hz stereo the next time Xsun is run.
The X server screen visuals list can be altered through ffbconfig . The ffbconfig options in TABLE 2-4 can be used to configure the list of the exported visuals for the specified device.
By default, the nonlinear visual comes before the linear visual on the screen visual list. You can modify the order of the visual list by using the ffbconfig command.
Most 3D applications require a linear visual. Some 3D applications do not search for a linear visual using XSolarisGetVisualGamma (3). Instead, these applications search the screen visual list for the first 24-bit TrueColor visual they find. To enable these applications to run with the correct visual, use the -linearorder option to change the visual list order so that the linear 24-bit TrueColor visual is the first one the application finds.
The desired visual ordering in the screen visuals list will be available whenever the window system is restarted.
 To change the setting, enter the
ffbconfig
command with one of the
-linearorder
options.
ffbconfig -linearorder first |
By default, the 8-bit PseudoColor visual comes before the 8-bit PseudoColor Overlay visual on the screen visual list. You can modify the order of the visual list by using the ffbconfig command.
Some applications that use the 8-bit PseudoColor Overlay visual, search the visual list for the first 8-bit PseudoColor visual they find. To enable these applications to run with the correct visual, use the -overlayorder option to change the visual list order so that the 8-bit PseudoColor Overlay visual is the first 8-bit PseudoColor visual the application finds.
The desired visual ordering in the screen visuals list will be available whenever the window system is restarted.
 To change the setting, enter the
ffbconfig
command with one of the
-overlayorder
options.
ffbconfig -overlayorder first |
By default, the 8-bit PseudoColor underlay visual is the default visual of the screen. The default visual can be changed to either a linear underlay visual or an overlay visual through ffbconfig .
 To set the default visual to be a linear visual, enter the
ffbconfig
command as follows:
ffbconfig -deflinear true |
 To set the default visual to be an overlay visual, enter the
ffbconfig
command as follows:
ffbconfig -defoverlay true |

|
Caution - Since there is no linear overlay visual, the user should not specify both "-deflinear true" and "-defoverlay true" simultaneously, or the result will be undefined. |
Solaris 2.5.1 SHWP supports the OpenGL visual expansion. With visual expansion, five visual groups: the 8-bit PseudoColor, 24-bit TrueColor (Linear and Non-Linear), 24-bit DirectColor, and 8-bit PseudoColor Overlay, are expanded from a single visual to multiple visual instances of the same visual type. Different instances of the same visual groups represent different GLX capabilities (e.g. single-buffer or double-buffer capable, monoscopic or stereoscopic capable, or a combination of both). The number of visual instances depends on whether the X server is started in monoscopic or stereoscopic mode, and also whether the device is a Creator or Creator 3D.
ffbconfig -expvis enable |
SERVER_OVERLAY_VISUALS is one of the root window's properties that contains the visual ID, transparent type, transparent value, and layer of the server overlay visuals (SOV) of the screen. You can toggle the advertisement of this property and the export of the transparent server overlay visuals using ffbconfig .
ffbconfig -sov enable |
The following options apply only to the Creator Series 3 Graphics Accelerator.
Gamma correction may be set by specifying a gamma correction value or by specifying a file that contains a gamma table.
The -g option will set the gamma table entries based on the gamma value specified. A gamma value of 2.22 represents linear gamma correction and matches the fixed value on the Creator and Creator 3D products. This value is a per-screen value and therefore all gamma corrected or linear visuals will use this value.
ffbconfig -g 2.22 |
The -gfile option will set the gamma table entries explicitly from a file containing three columns of 256 integers ranging from 0 to 255. The format is three integers separated by a newline character. Each line contains the RGB value to be put in the table for that entry. This value is a per-screen value and therefore all gamma-corrected or linear visuals will use this value.
ffbconfig -gfile filename |
Enabling the extended overlay option will switch the Series 3 Creator 3D from the standard overlay mode supported on series 1 or 2 to the new extended overlay functionality supported on Series 3. The extended overlay mode enables full 256-color overlays and hardware-accelerated Server Overlay Visuals. The maximum number of underlay Window IDs (WIDs) is increased from 32 to 64 and three new overlay WIDs are provided. Extended Overlays can only be enabled on DBZ boards running in a standard resolution.
ffbconfig -extovl enable |
In summary, the appearance of the X server screen visual list can be changed to fit the user's needs using any of the ffbconfig visual flags (e.g., linearorder , overlayorder , expvis , sov , etc.). This section briefly shows the effect of these visual options on the visual list.
Without any alteration using ffbconfig , the X server screen visual list can roughly be categorized in the following visual groups and order:
The default screen visual will be the 8-bit PseudoColor visual. The deflinear and defoverlay options will alter this pointer to point to the first 8- or 24-bit linear visual, depending on the X server depth when it starts up, and the first 8-bit overlay visual, respectively. You can rearrange the entire "8-bit PseudoColor Overlay" group, the "8-bit Linear StaticGray" group, and the "24-bit Linear TrueColor" group to be ahead of all other visual groups of the same depth by using the linearorder and overlayorder flags. For example, if you specify the following:
ffbconfig -overlayorder first |
The screen visuals list will be rearranged in the following order:
The expvis flag will change the number of visual instances in the following visual groups:
The number of instances that expvis will alter depends on whether the monitor is in monoscopic or stereoscopic resolution. In monoscopic resolution, if expvis is enabled, the order of the screen visual groups will be preserved, but within each group mentioned above, a "double-buffer capable" visual instance will be added. In stereoscopic resolution, two additional visual instances: "double-buffer, stereo capable" and "single-buffer, stereo capable", will be added. The "double-buffer capable" visual instances, if present, will always come ahead of the "single-buffer capable" visual instances, and the monoscopic visual instances will always come ahead of the stereoscopic ones.
For example, if you specify the following in stereoscopic resolution:
ffbconfig -overlayorder first -expvis enable |
the screen visual list will be:
|
Note - There is no double-buffer capable overlay visual instance. |
Without the sov option being enabled, the only overlay visuals available are the ones without transparency. Enabling the sov option will add the transparent SOV visual instances into the screen visual list and also add the SERVER_OVERLAY_VISUALS property to the root window property. The transparent SOV visual instances belong to the "8-bit PseudoColor Overlay" visual group. The SERVER_OVERLAY_VISUALS property will contain the visuals' ID, transparent type, value, and layer of all available overlay visuals of the screen.
For example, if you specify the following in stereoscopic resolution:
ffbconfig -overlayorder first -expvis enable -sov enable |
the screen visuals list will be:
and the SERVER_OVERLAY_VISUALS property will contain the following information:
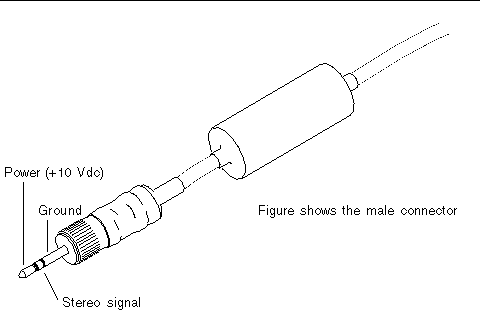
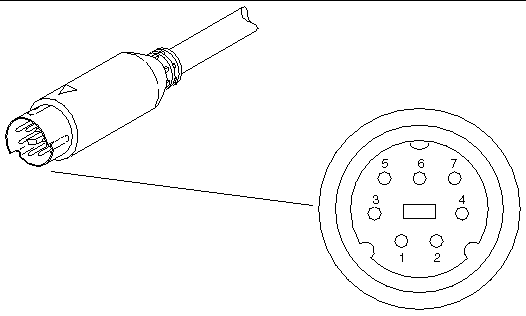
The stereo connector allows connection of stereo goggles to the Creator Graphics Accelerator. Two versions of stereo connector are used on the Creator Graphics Accelerator: a female, three-conductor, mini-phone connector used on the Series 1 board and a seven-pin DIN connector used on the Series 2 board.
The stereo connector for the Creator Series 1 board is a female, three-conductor, mini-phone connector, as shown in FIGURE 2-1 .

The stereo connector for the Creator Series 2 and Series 3 boards is a seven-pin DIN connector, as shown in FIGURE 2-2 .

TABLE 2-5 lists the stereo cable signals.
The STEREO signal is a TTL-level, 50 percent duty cycle signal that switches between left and right stereo shutters, as shown in FIGURE 2-3 .

A stereo cable and goggles for use with the Creator Graphics Accelerator are available from the following source:
StereoGraphics Corporation
2171-H East Francisco Blvd.
San Rafael, CA 94901
(415) 459-4500
FAX: 415-459-3020
Copyright © 2002, Sun Microsystems, Inc. All rights reserved.