


 How to Modify Configuration of a DHCP Network (dhtadm)
Determine which macro includes information for all clients of the network.
The network macro's name matches the network IP address.
If you don't know which macro includes this information, you can display the dhcptab database to list all macros by using the command dhtadm -P.
Type a command of the following format to change the value of the option you want to change:
# dhtadm -M -m macro-name -e 'symbol=value'
For example, to change the 10.25.62.0 macro's lease time to 57600 seconds and NIS domain to sem.example.com, type the following commands:
# dhtadm -M -m 10.25.62.0 -e 'LeaseTim=57600'
# dhtadm -M -m 10.25.62.0 -e 'NISdmain=sem.example.com'
Type the following command as root to make the DHCP daemon reread dhcptab:
# pkill -HUP in.dhcpd
Removing DHCP Networks
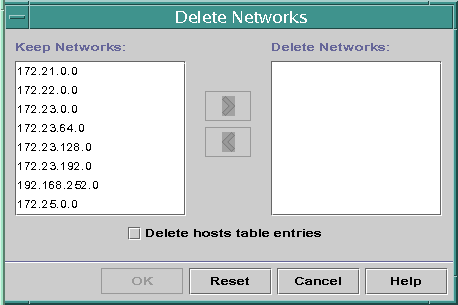
DHCP Manager enables you to remove multiple networks at once. You have the option to automatically remove the hosts table entries associated with the DHCP-managed IP addresses on those networks as well. The following figure shows DHCP Manager's Delete Networks dialog box.
Figure 10-7 Delete Networks Dialog Box
The pntadm command requires you to delete each IP address entry from a network before you delete that network. You can delete only one network at a time.
How to Remove a DHCP Network (DHCP Manager)
Select the Addresses tab.
Choose Delete Networks from the Edit menu.
The Delete Networks dialog box opens.
In the Keep Networks list, select the networks you want to delete.
Press the Control key while you click with the mouse to select multiple networks, or press the Shift key while you click to select a range of networks.
Click the right arrow button to move the selected networks to the Delete Networks list.
If you want to remove the host table entries for the DHCP-managed addresses on this network, select Delete Host Table Entries.
Note that this does not delete the host registrations at the DNS server for these addresses. It affects only the local name service.
Click OK.
How to Remove a DHCP Network (pntadm)
Note that this procedure deletes the addresses on the network before removing the network. This ensures that the host names are removed from the hosts file or database.
On the server system, become superuser or a user assigned to the DHCP Management profile.
Type a command following this format to remove an IP address and its host name from the name service:
# pntadm -D -y IP-address
For example, to remove address 10.25.52.1, type the following command:
# pntadm -D -y 10.25.52.1
The -y option specifies to delete the host name.
Repeat the pntadm -D -y command for each address in the network.
You might want to create a script to do this if you are deleting many addresses.
After all addresses are deleted, type the following command to delete the network from the DHCP service.
# pntadm -R network-IP-address
For example, to remove network 10.25.52.0, type the following command:
# pntadm -R 10.25.52.0
See the pntadm man page for more information about using pntadm.
Supporting BOOTP Clients with DHCP Service (Task Map)
To support BOOTP clients on your DHCP server, you must set up your DHCP server to be BOOTP compatible. You can register BOOTP clients in the DHCP server's network table or reserve a number of IP addresses for allocation to BOOTP clients, depending how you set up BOOTP compatibility.
Note - BOOTP addresses are permanently assigned, whether or not you explicitly assign them a permanent lease.
The following task map lists tasks you may need to perform to support BOOTP clients and the procedures used to carry them out.
Task | Description | Instructions |
|---|---|---|
Set up automatic BOOTP support | Provide IP address for any BOOTP client on a DHCP-managed network, or on a network connected by a relay agent to a DHCP-managed network. This requires you to reserve a pool of addresses for exclusive use by BOOTP clients. This option may be more useful if the server must support a large number of BOOTP clients. | |
Set up manual BOOTP support | Provide IP address for only those BOOTP clients that have been manually registered with the DHCP service. This requires you to bind a client's ID to a particular IP address that has been marked for BOOTP clients. This option is useful for a small number of BOOTP clients, or in the event that you want to restrict the BOOTP clients that can use the server. | "How to Set Up Support of Registered BOOTP Clients (DHCP Manager)" |
How to Set Up Support of Any BOOTP Client (DHCP Manager)
Select Modify from the Service menu.
The Modify Service Options dialog box opens.
In the BOOTP Compatibility section of the dialog box, select Automatic.
Select Restart Server, if it is not already selected.
Click OK.
Select the Addresses tab in DHCP Manager.
Select addresses that you want to reserve for BOOTP clients.
Select a range of addresses by clicking the first address, pressing the Shift key, and clicking the last address.
Select multiple non-concurrent addresses by pressing the Control key while clicking each address.
Select Properties from the Edit menu.
The Modify Multiple Addresses dialog box opens.
In the BOOTP section, select Assign All Addresses Only to BOOTP Clients.
All other options should be set to Keep Current Settings.
Click OK.
Any BOOTP client can now obtain an address from this DHCP server.