Adding, Modifying, and Removing DHCP Networks (Task Map)
When you configure a DHCP server, you must also configure at least one network in order to use the DHCP service. You can add more networks at any time.
The following task map lists tasks you may need to perform when working with DHCP networks and the procedures used to carry them out.
Task | Description | Instructions |
|---|---|---|
Enable or disable DHCP service on server network interfaces | The default behavior is to monitor all network interfaces for DHCP requests, but you can change this. | "How to Specify Network Interfaces for DHCP Monitoring (DHCP Manager)" |
Add a new network to the DHCP service | Place a network under DHCP management, for the purpose of managing IP addresses on the network. | |
Change parameters of a DHCP-managed network | Modify the information that is passed to clients of a particular network. | "How to Modify Configuration of a DHCP Network (DHCP Manager)" |
Delete a network from the DHCP service | Remove a network so that IP addresses on the network are no longer managed by DHCP. |
Specifying Network Interfaces to Monitor for DHCP Service
By default, both dhcpconfig and DHCP Manager's Configuration Wizard configure the DHCP server to monitor all the server system's network interfaces. If you add a new network interface to the server system, the DHCP server automatically monitors the new interface when you boot the system. You can then add any networks that will be monitored through the network interface.
However, DHCP Manager also allows you to specify which network interfaces the DHCP service should monitor and which it should ignore. You might want to ignore an interface if you do not want to offer DHCP service on that network.
If you specify that any interface should be ignored, and then install a new interface, the DHCP server ignores the new interface unless you add it to the server's list of monitored interfaces. You can specify interfaces with DHCP Manager.
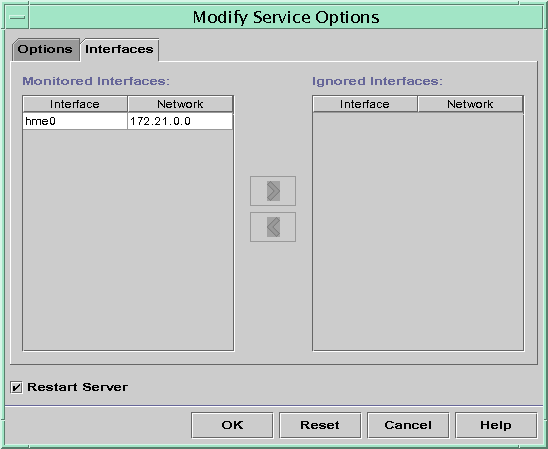
This section includes a procedure that enables you to specify which network interfaces DHCP should monitor, and which to ignore. The procedure uses the Interfaces tab of the DHCP Manager's Modify Service Options dialog box, which is shown in the following figure.
Figure 10-4 Interfaces Tab of Modify Service Options Dialog Box

 How to Specify Network Interfaces for DHCP Monitoring (DHCP Manager)
Choose Modify from the Service menu.
The Modify Service Options dialog box is displayed.
Select the Interfaces tab.
Select the appropriate network interface and click the arrow buttons to move the interface to the Monitored Interfaces list or the Ignored Interfaces list.
For example, to ignore an interface, select it in the Monitored Interfaces list and click the right arrow button to move the interface in the Ignored Interfaces list.
Make sure Restart Server is selected and click OK.
Adding DHCP Networks
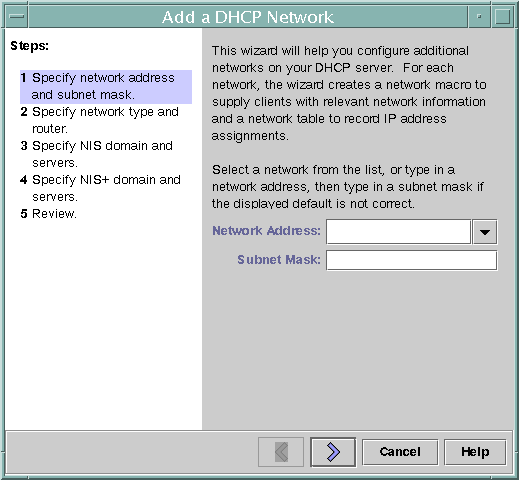
When you use DHCP Manager to configure the server, the first network (usually the local one on the server system's primary interface) is also configured at the same time. If you want to configure additional networks, use the DHCP Network Wizard in DHCP Manager.
If you use dhcpconfig -D to configure the server, you must manually configure all networks that will be served by the DHCP service. See "How to Add a DHCP Network (dhcpconfig)" for more information.
The following figure shows the initial dialog box for the DHCP Network Wizard in DHCP Manager.
Figure 10-5 DHCP Manager's Network Wizard

When you configure a new network, DHCP Manager creates the following components:
Network table in the data store. The new network is shown in the network list on the Addresses tab of DHCP Manager.
Network macro that contains information needed by clients that reside on this network. The network macro's name matches the IP address of the network. The network macro is added to the dhcptab in the data store.
 How to Add a DHCP Network (DHCP Manager)
Click the Addresses tab in DHCP Manager.
Any networks already configured for DHCP service are listed.
Choose Network Wizard from the Edit menu.
Select options or type requested information based on the decisions you made during the planning phase.
Planning is described in "Planning for Remote Network Configuration".
If you have difficulty with the wizard, click Help in the wizard window to open your web browser and display help for the DHCP Network Wizard.
Click Finish to complete the network configuration when you have finished entering the requested information.
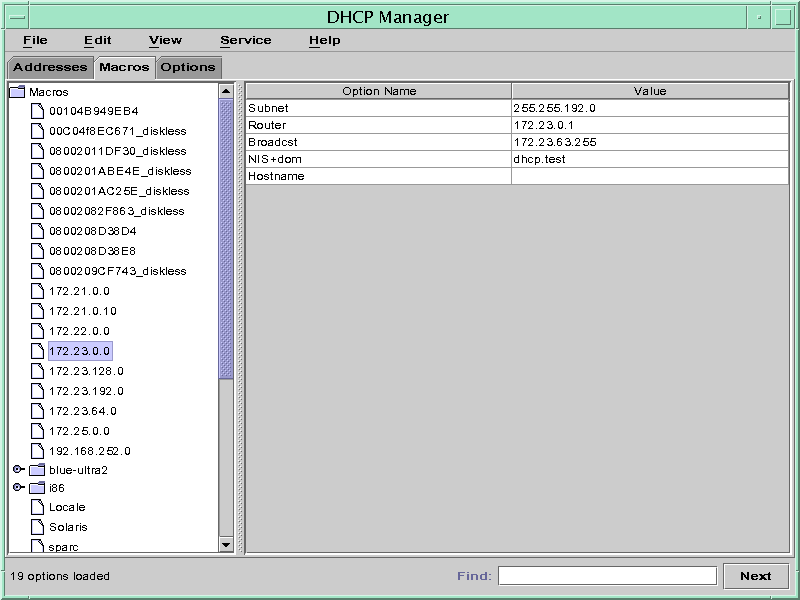
The Network Wizard creates a network macro whose name matches the IP address of the network. If you click the Macros tab in the DHCP Manager window and select the network macro, you can confirm that the information you provided in the wizard has been inserted as values for options contained in the macro.
The Network Wizard creates an empty network table, which is listed in the left pane of the window. You must add addresses for the network before the network's IP addresses can be managed under DHCP. See "Adding Addresses to the DHCP Service" for more information.
 How to Add a DHCP Network (dhcpconfig)
Become superuser or a user assigned to the DHCP Management profile .
Type the following command on the DHCP server system:
# /usr/sbin/dhcpconfig -N network_address
where network_address is the IP address of the network you want to add to the DHCP service. See the dhcpconfig man page for suboptions you can use with the -N option.
If you do not use suboptions, dhcpconfig uses network files to obtain information it needs about the network.
Add IP addresses for the network so clients on the network can obtain addresses.
Modifying DHCP Network Configuration
After you add a network to the DHCP service, you can modify the configuration information you originally supplied by modifying the network macro used to pass information to the clients on the network.
The following figure shows the Macros tab of the DHCP Manager.
Figure 10-6 DHCP Manager's Macros Tab

 How to Modify Configuration of a DHCP Network (DHCP Manager)
Select the Macros tab.
All macros defined for this DHCP server are listed in the left pane.
Select the network macro whose name matches the network whose configuration you want to change.
The network macro name is the network IP address.
Choose Properties from the Edit menu.
The Macro Properties dialog box displays a table of the options included in the macro.
Select the option you want to modify.
The option name and value are displayed in text fields near the top of the dialog box.
Type the new value for the option and click Modify.
You can also add options here by clicking Select in the dialog box. See "Modifying DHCP Macros" for more general information about modifying macros.
Select Notify DHCP Server of Change and click OK.
The change is made to the dhcptab and the DHCP server is signaled to reread the dhcptab and put the changes into effect.


