| C H A P T E R 5 |
Using the SunVTS TTY User Interface |
This chapter describes how to run a test session using the SunVTS TTY UI. The procedures are written in a step-by-step form so you can use them to become familiar with SunVTS using the SunVTS TTY UI. This chapter is divided into the following sections:
|
Note - This chapter assumes that you have already performed the following procedures: |
See Appendix A for descriptions of each SunVTS window and dialog box.
This section describes how to use the fundamental features of the SunVTS TTY UI to perform diagnostic testing on a system. For information about using more advanced features, see Using Additional Features with the SunVTS TTY UI .
The SunVTS TTY UI is an ASCII based, screen-oriented interface that does not require a graphical window environment. Most of the control and monitoring options that are available in the SunVTS graphical interfaces are also available in the TTY interface.
You can use the TTY interface to run SunVTS from a serial terminal, or through a graphical window tool such as a shell tool, command tool, or CDE terminal window.
The procedures in this chapter explain how to use the TTY main window:
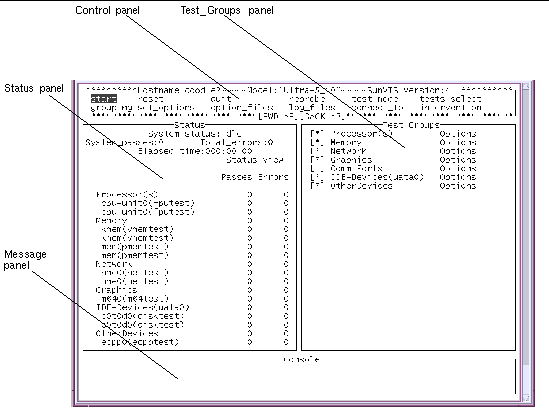
Use keyboard commands instead of mouse and pointer action to control SunVTS in the TTY UI. The following table lists the keyboard commands and explains how to use them.
|
|
1. Identify the current state of SunVTS in the Status panel.
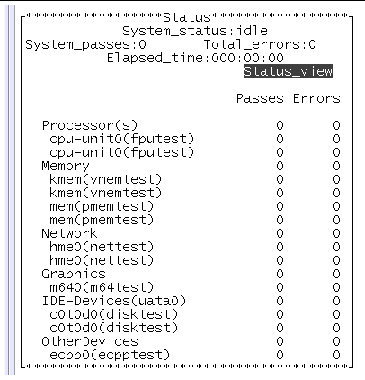
System_passes --displays the total number of successful system passes (a system pass is when all tests have run once).
Elapsed_time --indicates the total number of hours, minutes, and seconds that elapsed during testing.
2. Select a test mode (Functional or Connection).
Connection test mode--provides a low-stress, quick testing of the availability and connectivity of selected devices. These tests are non-intrusive, meaning they will release the devices after a quick test and they will not place a heavy load on system activity.
Functional test mode--provides more robust testing of your system and devices. It will use your system resources for thorough testing and it assumes that no other applications are running.
a. Use the tab key to move to the Control panel ((if needed).
b. Use the arrow keys to highlight test_mode and press return.
The test_mode menu is displayed.
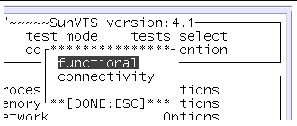
c. Use the arrow keys to highlight functional or connectivity and press return.
d. Use the arrow key to highlight
OK
in the confirmation dialog box and press return.
|
Note Note - You can exit any menu, at any time with the <Esc> key. |
3. Specify the display mode (logical or physical).
Logical Mapping--organizes the devices, according to their function, into groups. For example, SCSI disk, SCSI tape, and SCSI CD-ROM drives are placed in the SCSI-Devices group. You can focus your testing on a specific device, device group, or on all of the groups on the system.
Physical Mapping--shows the exact location of each device on the system in relation to how the devices are connected to each other. If you are testing a single-board type system, each device is shown under the system board. Multi-board type systems show each device under the board (for example, board0, board1, and so on) to which the device is attached. For example, if you have multiple disk drives connected to different disk interfaces, each disk would be displayed under the respective interface. From Physical Mapping, you can determine the actual location of each device. When possible, the board number and controller type for the device are also displayed.
a. Use the arrow keys to highlight grouping and press return.
The grouping menu is displayed.
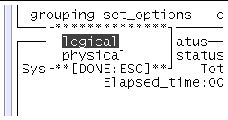
b. Use the arrow keys to highlight logical or physical and press return.
4. Enable Intervention mode (if needed).
Any device that requires your intervention before the test can run (such as loading media for tape, CD-ROM, and diskette tests) also requires that you notify SunVTS that you have performed this action by enabling Intervention mode. You can not select any intervention mode devices until you enable this mode.
a. Prepare the device for testing (see Preparing Devices for Testing ).
b. Use the tab key to move to the Control panel.
c. Use the arrow keys to highlight intervention and press return.
5. Select the device groups that you want to test.
An asterisk next to a device group in the Test_Groups panel indicates that the devices in that group are selected . Depending on the devices on your system, and the test mode that you select, SunVTS selects certain devices by default. You can change the selected devices.
a. Use the tab key to move to the Control panel.
b. Use the arrow keys to highlight test_select and press return.
6. Select specific devices to test.
In the previous step, you selected sets of devices for testing by choosing device groups. You can further refine your device selection by selecting or deselecting specific devices.
a. Use the tab key to move to the Test_Groups panel.
b. Use the arrow keys to highlight the device group for which you plan to select or deselect individual devices, and press return.
The individual devices within that group are displayed in a list.
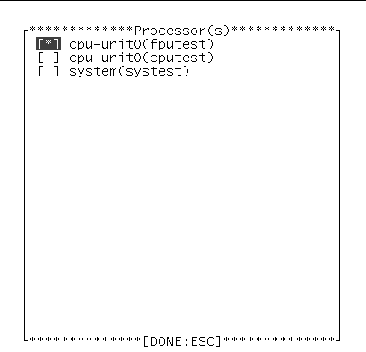
c. Use the arrow keys to highlight the [ ] (brackets) next to the device that you want to select or deselect.
d. Press the space-bar to toggle the asterisk.
e. Press return to close the group.
Notice that the Status panel displays (or removes) the devices as you select (or deselect) them.
7. Modify the system-level test options (if desired).
SunVTS is ready to test each device once you select it. You can, however, modify test options that alter the way tests run to suit your testing needs. There are three levels where you control test options:
System-level options--control the testing attributes of all devices. This is the highest level, applying all your options globally. When you modify option values at this level, the option settings are propagated down to the group level and device level options.
Group-level options--control the testing attributes of all the devices in the group. Settings made at this level propagate down, setting all the options in the group.
The order that you apply the system-level, group-level, and device-level options is important. Start by assigning the system-level options, then assign the group-level options, and finish with the device-level options. Otherwise, if you make lower-level options, then higher-level options, the higher-level options will propagate down and undo your lower-level options. An alternative to this approach is to use locks and overrides to protect lower-level options. See Preserving Test Options with Locks and Overrides .
a. Tab to the Control panel.
b. Use the arrow keys to highlight set_options and press return.
The set_options menu is displayed.
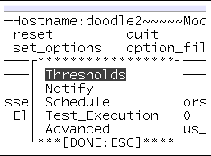
c. Use the arrow keys to select one of the following menus, and press return:
|
Note Note - For descriptions of these menus see SunVTS Dialog Boxes. |
d. Use the arrow keys and numeric keys to set the options values.
8. Modify group-level and device-level options (if desired).
About group-level and device-level options :
Group-level and device-level options are similar to the system-level testing attributes, but instead pertain to a specific device (or device group) only. You modify these options by changing values in the following dialog boxes:
Test_Parameters
a. Tab to the Test_Groups panel.
b. Use the arrow keys to highlight the device group and press return.
At this point you can choose to access the group-level option menu instead by highlighting Option (instead of the device-level) and press return. Then go to Step d. Otherwise, the following steps will direct you to modify device-level options.
c. Use the arrow keys to select a device from the device list and press return.
The Test_Options menu is displayed.
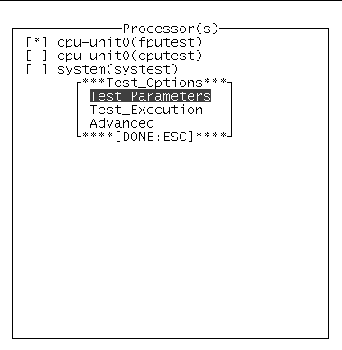
d. Select one of the option dialog boxes (
Test_Parameters
,
Test_Execution
, or
Advanced
) and press return.
|
Note Note - For descriptions of these menus, see SunVTS Dialog Boxes. |
e. Use the arrow and numeric keys to modify the options in the dialog box.
f. Use the arrow keys to highlight apply and press return.
If you selected the Test_Parameters dialog box, you will be prompted to apply your changes to one of the following:
Within_Instance --applies the option settings to this test instance (test instance 1 for example) for this device with Apply , or to all the same instances within the same device-group with Apply_to_group , or to all the same instances for all like devices with Apply_to_All .
Across_All_Instances --applies the option settings to all test instances (for example, instance 1 and 2) to this device with Apply , or to all the instances for all the devices in the group with Apply_to_group , or to all the instances for all like devices with Apply_to_all .

The test session configuration is complete. Continue to the next procedure to run the test session.
|
|
a. Use the tab key to move to the Control panel.
b. Use the arrow keys to highlight start and press return.
Depending on how you configured the options in the Test_Execution menus, testing will continue until:
a test error is detected (this is the default behavior). If you enter a value for Run_On_Error , SunVTS continues to run until the specified number of errors is reached.
2. Monitor the overall test session status by watching the Status panel.
The Status panel indicates that a test session is running by displaying testing for the System_status . The System_passes , Total_errors , and elapsed_time will increment.
3. Monitor specific tests by watching the Status panel.
An asterisk--displayed next to each device indicating which device is currently under test. Depending on how you configured SunVTS (with the System Concurrency option), single or multiple devices are tested concurrently.
4. Check for test messages by watching the Message console panel.
The Message console panel displays test messages under the following circumstances:
Use the up and down arrow keys to scroll through messages in this panel.
5. Stop the test session (if desired).
a. Use the tab key to move to the Control panel.
b. If stop is not highlighted, use the arrow keys to highlight it, and press return.
The test session displays a confirmation menu.
|
|
SunVTS provides access to four log files:
SunVTS test error log--contains time-stamped SunVTS test error messages. The log file pathname is /var/opt/SUNWvts/logs/sunvts.err . This file is not created until a SunVTS test failure occurs.
SunVTS kernel error log--contains time-stamped SunVTS kernel and SunVTS probe errors. SunVTS kernel errors are errors that relate to running SunVTS, and not to testing of devices. The log file pathname is /var/opt/SUNWvts/logs/vtsk.err . This file is not created until SunVTS reports a SunVTS kernel error.
SunVTS
information log--contains informative messages that are generated when you start and stop SunVTS test sessions. The log file pathname is
/var/opt/SUNWvts/logs/sunvts.info
. This file is not created until a SunVTS test session runs.
Solaris system message log--is a log of all the general Solaris events logged by syslogd . The pathname of this log file is /var/adm/messages.
a. Use the tab keys to move to the Control panel.
b. Use the arrow keys to highlight log_files .
The log_files menu is displayed.
c. Use the arrow keys to select one of the three log files and press return.
d. Use the arrow keys to select one of the following:
Display --the content of the log file is displayed.
There are many messages for each of the many tests that run under SunVTS. For this reason, it is difficult to document the implication of each message that you might see. Most messages contain all the explanatory text that is possible for each event that is encountered. Some messages are information messages ( INFO , VERBOSE , WARNING ) which do not represent an error, while some messages are error messages ( ERROR and FATAL ), indicating that the test detected a failure. This section explains generic test message information.
SunVTS information message example:
05/02/00 10:49:43 systemA SunVTS5.0: VTSID 8040 disktest. FATAL diskette: "Failed get_volmgr_name()" Probable_Cause(s): (1)No floppy disk in drive Recommended_Action(s): (1)Check the floppy drive |
Whenever possible, the error message supplies a message type (described in the following table), followed by the message text, one or more probable causes, and one or more recommended corrective actions.
The following table describes the types of messages you might encounter. All messages are displayed in the Message panel, and most are logged in one of the SunVTS logs ( Info or Error ).
You can write scripts that watch for certain SunVTS events as they are logged in the log files, and which trigger an action when a particular message string occurs. If you plan to do this, read the information about the message format. See .
3. Reset the test session results (if desired).
a. Use the tab key to move to the Control panel.
b. Use the arrow keys to highlight reset and press return.
The information in the Status panel is reset. This does not reset your test options.
This section describes additional SunVTS features using the SunVTS TTY user interface:
You can connect the SunVTS user interface on your local system to a SunVTS kernel that is running on another system in your network. Once you are connected to the remote system, all of the controls in the TTY UI control the testing of the remote system.
|
|
1. Make sure that the SunVTS kernel is running on the remote system.
You can do this in several ways. You can remote login (using rlogin or telnet ) to the remote system and run the vtsk command (see To Start the SunVTS Kernel (vtsk) ) to start the kernel.
|
Note Note - On the remote system, you must login (or switch user) as a user that has SunVTS privileges (superuser by default) before you can start the SunVTS kernel (vtsk). |
2. Open the Connect_to_Host menu:
a. In the Control panel, highlight connect_to and press return.
b. Enter the remote system hostname in the connect_to_host field.
c. Highlight Apply and press return.
d. Press <Esc> when you receive the connect_to confirmation box.
The SunVTS UI now controls SunVTS on the remote system. The remote system hostname is displayed at the top of the TTY main menu.
You can have SunVTS send test status messages to you using email.
|
|
1. In the Control panel, highlight set_options and press return.
The set_options menu is displayed.
2. Select Notify and press return.
3. Complete the notify menu items.
4. Highlight Apply and press return.
The log file sizes of the SunVTS test error log ( /var/opt/SUNWvts/logs/sunvts.err ), the SunVTS kernel error log ( /var/opt/SUNWvts/logs/vtsk.err ) and the information log ( /var/opt/SUNWvts/logs/sunvts.info ) are each limited to a maximum size of 1 Mbyte by default. When the log file reaches the maximum size, the content is moved to a file called logfilename . backup . Additional events are added to the main log files. If the log file reaches the maximum size again, the content is moved to the backup file, overwriting the earlier backup file content. Only one backup file is maintained for each log file.
You can modify the log file maximum size specification.
|
|
1. In the Control panel, highlight set_options and press return.
The set_options menu is displayed.
2. Highlight Thresholds in the set_options menu and press return.
3. Enter a value ( 1-5 ) in the Max System Log Size field.
4. With Apply highlighted, press return.
With locks and overrides you can preserve or override the options you set at the system level, group level, and device level.
Normally, when you change an option setting at the system level or group level, the new option setting propagates down to all lower levels. Enabling the lock prevents an option setting made at a higher level from affecting the lower-level option setting.
|
|
1. Open the Test Advanced Options dialog box from the group level or device level you want to lock as follows:
a. Move to the Test_Groups panel.
b. Highlight the group that has the device for which you plan to set (or unset) a lock, and press return.
The group devices are displayed.
c. Highlight the device and press return.
The Test_Options menu is displayed.
d. Highlight Advanced and press return.
The Advanced options menu is displayed.
e. Highlight the setting for the Test Lock and press return.
f. Highlight enabled (or disabled ) and press return.
You can use overrides to void the lock protection. Setting the system-level override nullifies all locks, and setting a group-level override nullifies all the locks below that group.
|
|
1. Open the Advanced Option dialog box at one of the following levels:
2. Highlight the Override setting (enable/disable), and press return.
The enable disable menu is displayed.
3. Select enable (or disable ), and press return.
4. Highlight Apply , and press return.
You can use a combination of options to scale testing intensity to meet your diagnostic needs. For example, you can modify test options so that each test instance runs simultaneously, thus increasing the stress level for a single or multiprocessor system. The following procedures can be used individually or in combination to scale the test session.
|
|
You can scale your test session by running multiple copies of the same test on your devices. Each copy is called a t est instance . Each test instance is a separate process of the same test. The number of test instances can be set at the system level, group level, and the device level as follows:
1. Open the Test_Execution Option menu at one of the following levels:
2. Highlight the Num of Instances setting, and enter the value you want.
3. Highlight Apply , and press return.
|
|
The test concurrency option sets the number of tests that run at a given time during a test session. You can set this value to one to run one test at a time, or increase the test concurrency value thus increasing the stress level of your test session.
There are two options you can modify in the Schedule Option dialog boxes (at the system level and group level) to scale your test session:
System Concurrency--sets the maximum number of tests that run simultaneously at the system level. It overrides the Group Concurrency option.
Group Concurrency--sets the maximum number of tests that run simultaneously in the same group.This option is available at the system level and the group level.
1. Open the Schedule Option menu at one of the following levels:
2. Highlight the concurrency setting, and enter the value you want.
3. Highlight Apply , and press return.
|
|
By default, the Solaris kernel assigns each test instance to whichever processor is available at the time. On multiprocessor systems, you can bind (assign) a test instance to a particular processor as follows:
1. Open the Test_Execution Option menu at one of the following levels:
|
Note Note - The Processor Affinity field is only displayed on multiprocessor systems. |
2. Highlight the Processor Affinity setting, and enter the value you want.
3. Highlight Apply , and press return.
You can enable certain options that cause the SunVTS test session to output more test data than when you run the session with the default option values. The following procedures describe how to enable these features.
|
|
1. Open the Test_Execution Option menu at one of the following levels:
2. Enable (or disable) one or more of the following options:
Verbose --displays verbose messages indicating when the test is starting and stopping during the test session.
Core File --when enabled, creates a core file when a test session results in a core dump. The core file is called s unvts_install_dir /bin/core . testname . xxxxxx , where testname is the test that dumped the core, and xxxxxx is a character string generated by the system in order to make the file name unique.
3. Highlight Apply , and press return.
You can use the Option Files feature to save the current set of selected devices and test options for reuse. This is a convenient feature when you plan to use the same test session configuration over and over again.
The configuration information is saved in a filename of your choice in the
/var/opt/SUNWvts/options
directory.
|
Note Note - Do not manually edit any option file. Unnecessary or spurious characters in the option file can cause unexpected behavior when you use them. |
|
|
1. Configure SunVTS for the test session that you want to save.
See To Configure SunVTS for a Test Session .
2. Highlight option_files in the Control panel, and press return.
The Option Files menu box is displayed.
3. Specify an option file name in the Option File field.
4. Highlight Store , and press return.
|
|
|
Note Note - Loading an option file that was created on another system is permitted, but you must make sure that the configuration is valid for the system you plan to test. |
|
Note Note - Do not load an option file that was created in a |
1. Highlight option_files in the Control panel, and press return.
The Option Files menu box is displayed.
2. Highlight List and press return.
The list of available option files is displayed.
3. Highlight an option file from the list, and press return.
4. Highlight Load , and press return.
The test session configuration is loaded into SunVTS. You can use this configuration, or modify it before you start the test session.
|
|
1. Highlight option_files in the Control panel, and press return.
The Option Files menu box is displayed.
2. Highlight List and press return.
The list of available option files are displayed.
3. Highlight the option file from the list that you want to delete, and press return.
4. Highlight Remove , and press return.
You can use the auto-start feature, along with saved option files, to simplify the process of configuring a test session and running it.When the auto-start feature is turned on in an option file, SunVTS automatically starts the test session when the option file is invoked, eliminating the need to select the start button.
|
|
1. Highlight set_options from the Control panel, and press return.
The set_options menu is displayed.
2. Highlight Schedule and press return.
The Schedule menu is displayed.
3. Enable the Auto Start setting in the Schedule menu.
4. Highlight Apply and press return.
5. Create an option file as described in To Create an Option File .
The option file that you create is configured to use the auto-start feature.
|
|
1. Highlight quit UI and Kernel from the quit menu in the Control panel.
You must quit SunVTS and restart it for the auto-start feature to work.
2. Use the following command to restart SunVTS from the command-line, specifying the Option File that you created:
SunVTS displays the TTY main window and automatically starts the test session.
You can suspend a test session. For example, you might want to look at messages on the Console panel that have scrolled out of view, or you may want to view and print a log file.
|
|
1. While the test session is running, highlight suspend in the Control panel, and press return.
"Suspended" is displayed in the Status panel, and the test session pauses until you resume it.
2. While the test session is suspended, highlight resume in the Control panel, and press return.
"Testing" is displayed in the Status panel, and the SunVTS kernel resumes the suspended test session.
You can use the Record and Replay feature to record a SunVTS test session. Only one test session recording is saved at a time.
The events are recorded in a file called /var/opt/SUNWvts/vts_replay_file .
Once a test session is recorded, you can use the recorded events to drive the SunVTS kernel so it reproduces the recorded sequence of events at a later time.
|
Note Note - The Record and Replay feature closely reproduces the sequence of events, but it cannot reproduce the time periods of these events because the execution times vary from one run to another. |
|
|
1. Configure SunVTS for the test session that you want to run.
See To Configure SunVTS for a Test Session .
2. Highlight start in the Control panel and press return.
3. Highlight Start with Record and press return.
The test session runs, and the events are recorded. When testing stops, the recorded session is available to replay.
4. Highlight start in the Control panel and press return.
5. Highlight Replay and press return.
The kernel reruns the same tests, with the same configuration that you specified.
|
Note Note - During the replay, the kernel is actually rerunning the tests, not just re-displaying the recorded session. |
SunVTS TTY UI provides a Deterministic Scheduler that allows you to determine what tests run, and in what order. If you do not use this feature, selected tests run in an order that is dynamically determined by the SunVTS kernel.
The Deterministic Scheduler is available as dsched Menu in the Control Panel in the SunVTS TTY UI.
|
Note Note - To select an item in the menu, highlight the item using the arrow keys, then press return. Use the <Esc> key to exit a menu, or |
The following list provides an overview of the steps you perform to start, run, and quit the Deterministic Scheduler feature. Detailed instructions follow.
Start SunVTS with the SunVTS TTY user interface as described in Chapter 3 .
Start the Deterministic Scheduler.
Create one or more tasks , using the Task Manager menu. A task is a SunVTS test session configuration (one or more selected SunVTS tests, test options, and specific test mode).
Create the sequence , using the Sequence Manager menu. A sequence is a group of tasks specified to run in a certain order.
Define the number of times ( loops ) that sequence runs, using the Sequence Runner menu.
Start the sequence.
When the sequence is done, reset the Deterministic Scheduler if desired.
Quit the Deterministic Scheduler from the main Dsched Menu .
|
|
1. Use arrow keys to highlight dsched (Deterministic Scheduler) in the control panel and press return.
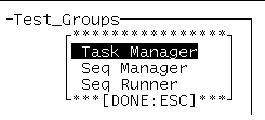
The Deterministic Scheduler menu is displayed.
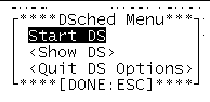
2. Start the Deterministic Scheduler by highlighting Start DS and pressing return.
The DSched Control menu is displayed and the Deterministic Scheduler feature is invoked.
3. Press <Esc> to return to the main SunVTS TTY window.
You are returned to the SunVTS main window in preparation to configure tasks.
|
|
1. In the Test Groups panel, configure a test session (select one or more devices, test options, and your desired test mode).
If you assign more than one test to a task, the order of the tests within this task cannot be predicted. If you want to control the order of every test, assign only one test for each task.
For details about configuring a test session, refer to To Configure SunVTS for a Test Session .
2. Use arrow keys to highlight dsched (Deterministic Scheduler) in the control panel and press return.
3. Highlight Show DS and press return.
The DSched Control menu is displayed ( FIGURE 5-10 ).
4. Display the Task Manager menu by selecting Task Manager , and press return.
The Task Manager menu is displayed.

5. In the Task Manager menu, enter a task name in the Task File text field.
6. Select Store and press return to save the task.
Your task is created with the test configuration you specified in Step 1 .
7. Repeat this procedure as needed to create the all the tasks you plan to use in a sequence.
|
|
1. Select List... from the Task Manager menu ( FIGURE 5-11 ) and press return.
The Tasks Available menu is displayed with the list of Available Tasks. If this is the first time that the Deterministic Scheduler is used, you must create a minimum of one task before any tasks are available to view.
2. To see the test session configuration for a particular task, select the task, and press return.
3. Select Load and press return.
The SunVTS Status panel shows the SunVTS test configuration associated with the selected task.
|
|
1. Select List... from the Task Manager menu ( FIGURE 5-11 ) and press return.
2. Select the task you plan to modify, and press return.
3. Select Load and press return.
The SunVTS Status panel shows the SunVTS test configuration associated with the selected task.
4. Change the test configuration in the main window.
5. In the DSched Task Manager menu, select Store .
|
|
1. Select List... from the Task Manager menu ( FIGURE 5-11 ) and press return.
2. Select the task you plan to delete, and press return.
3. Select Remove in the Task Manager menu, and press return.
4. Select OK in the confirmation menu, and press return.
|
|
1. Invoke the Sequence Manager menu by selecting the Sequence Manager ( FIGURE 5-12 ) in the DSched Control menu ( FIGURE 5-10 ).

2. Enter the name of the sequence file you want to create in the Sequence Name text field.
By default, the Deterministic Scheduler displays the text field with a .sequence suffix. This filename suffix is not mandatory.
3. Select Task Insert/Delete -> Insert Tasks in the Sequence Manager menu.
4. Select Insert Tasks and press return.
The Tasks Available menu is displayed.
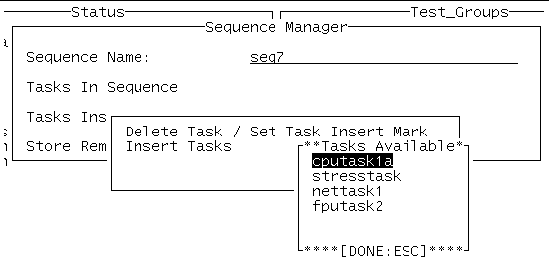
5. Select a task from the list and press return.
This displays a menu with Insert Task as the only choice.
The task you selected is inserted into the sequence.
The order in which you add tasks is the order they will be run in the sequence, with the first added task running first, and the last task running last. However, you can insert tasks into specific places in your list of tasks as described later in this section.
7. Repeat
Step 5
and
Step 6
to add additional tasks into the sequence.
|
Note Note - Use the <Esc> key to move back to previous menus. |
8. Select Store in the Sequence Manager menu ( FIGURE 5-13 ) and press return.
Your sequence is saved for future use. To run the sequence see To Run the Sequence .
|
Note Note - Select Close in the Sequence Manager menu to move back to the DSched Control menu. |
|
|
1. Display the Sequence Manager menu (accessed from dsched ➤ Show DS ➤ Sequence Manager menu).
2. Select List... in the Sequence Manager menu and press return.
3. Highlight the sequence you want to see, and press return.
If the list is long, use control-F (forward) and control-B (backwards) to scroll through the sequences.
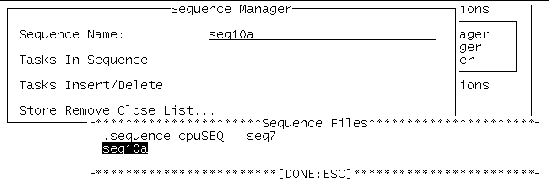
4. You can view the list of tasks available in this sequence by selecting Tasks In Sequence in the Sequence Manager menu.
|
|
1. Display the Sequence Manager menu (accessed from dsched ➤ Show DS ➤ Sequence Manager menu).
2. Select list... in the Sequence Manager menu and press return.
The list of sequences is displayed.
3. Select the sequence you plan to modify and press return.
4. Select Task Insert / Delete and press return.
The Tasks In Sequence menu is displayed with a list of tasks in the sequence.
5. Select Delete Task/Set Task Insert Mark and press return.
The list of tasks for this sequence is displayed.
6. Select the task you want to delete and press return.
A menu with two choices is displayed.
7. Select Delete Task and press return.
The selected task is deleted from the sequence.
8. Repeat the above steps to remove additional tasks as desired.
9. Use the <Esc> key to move back to the Sequence Manager menu.
10. Save your changes by selecting Store and press return.
11. Select ok and press return.
12. Select Close to exit the Sequence Manager menu.
|
|
1. Display the Sequence Manager menu (accessed from dsched ➤ Show DS ➤ Sequence Manager menu).
2. Select list... in the Sequence Manager menu and press return.
The list of sequences is displayed.
3. Select the sequence you plan to modify and press return.
4. Select Task Insert/Delete Task and press return.
5. Delete Set Task Insert Mark and press return.
The list of tasks for this sequence is displayed.
6. Use the arrow keys to select the task that is directly above the place where you want the new task inserted, and press return.
7. Select Set Insert Mark , and press return.
This marks your insertion point. Any task you add after this step, in this sequence, will be inserted below this insertion mark.
8. Use the <Esc> key to move back to the Insert Task menu.
9. Select Insert Task and press return.
The list of available tasks is displayed.
10. Select the task you want to add and press return.
11. With I nsert Task highlighted, press return.
The task is inserted below the insert mark.
12. Repeat Step 10 and Step 11 for all the tasks you want to add.
13. Use the <Esc> key to move back to the Sequence Manager menu.
14. Save your changes by selecting Store and pressing return.
15. Select ok and press return.
16. Select Close to exit the Sequence Manager menu.
|
|
1. Display the Sequence Manager menu (accessed from dsched ➤ Show DS ➤ Sequence Manager menu).
2. Select list... in the Sequence Manager menu and press return.
The list of sequences is displayed.
3. Highlight the sequence you want to delete, and press return.
4. Select Remove in the Sequence Manager menu and press return.
5. Select ok and press return.
The selected sequence is deleted from the Deterministic Scheduler.
|
Note Note - The tasks associated with the deleted sequence are not deleted. |
6. Select Close to exit the Sequence Manager menu.
|
|
1. Invoke the Sequence Runner menu by selecting Seq Runner in the Start DS menu.
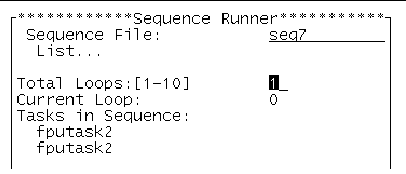
2. Select the sequence that you want to run by selecting List... , highlighting the sequence, and press return.
3. Change the
Total Loop
value to the number of times you want to repeat the sequence of tests.
|
Note Note - The default and minimum number of Total Loops value is 1. You can change the Total Loop value to the desired value, up to a maximum of 10 loops. |
4. Select the Start button at the bottom of the Sequence Runner menu start the sequence.
While testing is underway, you can do any of the following:
Monitor the test progress in the TTY Status panel. All test results are logged in the SunVTS log files.
Suspend and resume the sequence by selecting the Suspend and Resume commands in the Sequence Runner menu.
Close the Sequence Runner menu by selecting the Quit DS UI from the Quit DS menu. Testing will continue, and results will be displayed in the TTY Status panel.
|
Note Note - When the Deterministic Scheduler is running, the selection of Show DS displays the Sequence Runner menu. Otherwise, this selection causes the Start DS menu to display. |
|
|
1. Use the Reset in the main window to reset the Status panel and Deterministic Scheduler.
The TTY Status panel test statistics and the Deterministic Scheduler current loop count are reset.
|
|
1. To
quit the Deterministic Scheduler when you are done, select
dsched
 Quit DS Options
 Quit DS
.
Copyright © 2002, Sun Microsystems, Inc. All rights reserved.